[postlink]http://testlifepsd.blogspot.com/2010/03/modernistic-navigation-module.html[/postlink]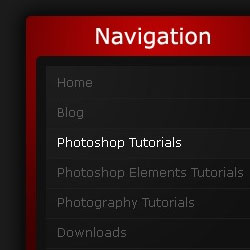 Create this beautiful navigation module with Photoshop. This Photoshop layout tutorial will show how simple shapes and gradients can create elegant designs.
![step9[4]](http://photoshoptutorials.ws/images/stories/ModernisticNavigationModule_18DD/step94.jpg)
![step1[7]](http://photoshoptutorials.ws/images/stories/ModernisticNavigationModule_18DD/step17.jpg)
![step2a[4]](http://photoshoptutorials.ws/images/stories/ModernisticNavigationModule_18DD/step2a4.jpg) We are now goingt to be filling this selection with a red gradient. Select the gradient tool and set it to radial. Fill the selection with a gradient from the top center (#bc0303) to the bottom center (#3f0000).
We are now goingt to be filling this selection with a red gradient. Select the gradient tool and set it to radial. Fill the selection with a gradient from the top center (#bc0303) to the bottom center (#3f0000).
![step2b[4]](http://photoshoptutorials.ws/images/stories/ModernisticNavigationModule_18DD/step2b4.jpg)
![step3a[4]](http://photoshoptutorials.ws/images/stories/ModernisticNavigationModule_18DD/step3a4.jpg) Now it should be looking like this.
Now it should be looking like this.
![step3b[4]](http://photoshoptutorials.ws/images/stories/ModernisticNavigationModule_18DD/step3b4.jpg)
![step4[4]](http://photoshoptutorials.ws/images/stories/ModernisticNavigationModule_18DD/step44.jpg)
![step5a[4]](http://photoshoptutorials.ws/images/stories/ModernisticNavigationModule_18DD/step5a4.jpg) Fill this selection with a dark grey colour (#111111).
Fill this selection with a dark grey colour (#111111).
![step5b[4]](http://photoshoptutorials.ws/images/stories/ModernisticNavigationModule_18DD/step5b4.jpg)
![step6a[4]](http://photoshoptutorials.ws/images/stories/ModernisticNavigationModule_18DD/step6a4.jpg) Fill the selection with a radial gradient from the top left (#ffffff) to the bottom right (transparent) using the gradient tool.
Fill the selection with a radial gradient from the top left (#ffffff) to the bottom right (transparent) using the gradient tool.
![step6b[4]](http://photoshoptutorials.ws/images/stories/ModernisticNavigationModule_18DD/step6b4.jpg) Lower the opacity of the layer to 5%.
Lower the opacity of the layer to 5%.
![step6c[4]](http://photoshoptutorials.ws/images/stories/ModernisticNavigationModule_18DD/step6c4.jpg)
![step7[4]](http://photoshoptutorials.ws/images/stories/ModernisticNavigationModule_18DD/step74.jpg)
![step8[4]](http://photoshoptutorials.ws/images/stories/ModernisticNavigationModule_18DD/step84.jpg)
Create this beautiful navigation module with Photoshop. This Photoshop layout tutorial will show how simple shapes and gradients can create elegant designs. Preview of Final Results
Modernistic Navigation Module Photoshop Tutorial
Step 1
Firstly create a new document (File > New) 540 by 440 pixels. Fill the background with the colour #1b1b1b by going Edit > Fill.Step 2
Secondly we are going to be creating the background of the navigation box. Create a new layer, you can do this by going Layer > New > Layer or using the short cut Ctrl + Shift + Alt + N. Select the rounded rectangle tool and set the radius to 5 pixels. Make a selection of 250 by 300 pixels.Step 3
Thirdly, we are going to be adding an outer glow to our navigation background by going Layer > Layer Styles > Outer Glow and enter the settings below.Step 4
Select the text tool and add in some text for the title of the navigation box. The font I have used is Verdana, Regular, 22pt, Strong, #ffffff.Step 5
Create a new layer and using the rounded rectangle tool again make a selection of 230 by 250 pixels at the bottom of the navigation background (with 10 pixel spacing on the sides and bottom).Step 6
We are now going to be adding a shine effect to the new layer. So on a new layer (keeping the selection that you had before) go Select > Modify > Contract by 10 pixels.Step 7
Now for the text links, using the text tool add in some text to act as links. The font that I have used for this is Verdana, Regular, 12pt, None, #5a5a5a (#ffffff for the hover effect). Set the line height to 30 pt.Step 8
Next up is adding in dividers to go between each text link. Make selections of 210 by 1 pixel using the rectangular marquee tool between each line and fill with the colour #1e1e1e.Step 9
The last step is to add in a background colour behind the active link (in my case I've made the Photoshop Tutorials link active) so create a new layer behind the text layer and make a selection of 210 by 30 pixels and fill with #171717.source: photoshoptutorials.ws
0 comments:
Post a Comment