[postlink]http://testlifepsd.blogspot.com/2010/02/split-toning.html[/postlink]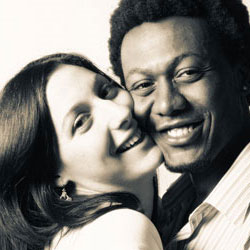 Between grayscale and color is split toning. Add this slight change for a dramatic effect. This Photoshop technique can also be used to create retro or abstract results.


 With the two adjustment layers, one will let us change the color of the shadows and the other the highlights. In the next step, we'll add data to the layer mask so that the highlights layer only affects the highlights.


 You can also try out other color combinations instead of the traditional sepia/blue colors. Below are some examples of what can be done using this technique.


Between grayscale and color is split toning. Add this slight change for a dramatic effect. This Photoshop technique can also be used to create retro or abstract results. Preview of Final Results
Split Toning Photoshop Tutorial
Step 1: Run Photoshop and open a photo
Start Photoshop and open any photo. This photo effect will work with most versions of Photoshop.Step 2: Add a Hue/Saturation adjustment layer
Choose Layer > New Adjustment Layer > Hue/Saturation. When the Hue/Saturation window appears, click OK without changing any settings. You should now have a new Hue/Saturation layer in your layers palette.Step 3: Duplicate the layer and rename
Make sure that you have the Hue/Saturation adjustment layer selected in the layers palette. Press Ctrl+J or go to Layer > Duplicate Layer. You should now have two adjustment layers. Rename the top layer to Highlights and the middle layer to Shadows. To rename a layer, double-click on the layer name in the layers palette.Step 4: Apply a copy of the image into the highlights layer mask
Before we start, click on the layer mask thumbnail in the Layers palette to select it. It should now have a white border around it to indicate that the layer mask is selected. With the layer mask selected, choose Image> Apply Image. In the Apply Image tool, simply click OK to use the default settings. You should now see a copy of the image in the highlights layer mask.
Step 5: Set the color of the highlights
Now that we have all our layers properly set up, we can specify the colors for the highlights and shadows of the image. First, start by double clicking on the Hue/Saturation icon of the Highlights layer in the layers palette. A Hue/Saturation window will appear where you can adjust the color. Checkmark Colorize near the bottom right of the Hue/Saturation window. Adjust the settings to achieve the color you want. Once you're done, the image should look tinted.Step 6: Set the color of the shadows
Now we'll do the same thing to set the color of the the shadows. Edit the settings of the Shadows layer. You should see a live preview of the effect if you have the preview checkbox checked. The balance between the two colors may not be what you desire, but don't worry about that now because we'll work on it in the next step. For now, just get the color of the shadows to the color you like.Step 7: Adjust the balance between the two colors
To adjust the balance, we'll be working on the layer mask of the highlights layer. Select the layer mask of the highlights layer then open the Levels tool (Ctrl+L or Image > Adjustments > Levels). Drag the middle input slider toward the left or right to alter the balance of the two colors. For example, in the image below, I gave the orange tint more strength so that the blue is only slightly visible.Final Results
Original image

Split Toning Photoshop tutorial
source: photoshoptutorials.ws
0 comments:
Post a Comment