[postlink]http://testlifepsd.blogspot.com/2010/02/star-filter.html[/postlink]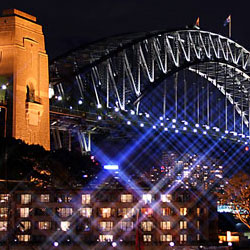 Make night scenes more glamorous with this Photoshop effect that generates dazzling star effects from light sources. In this Photoshop tutorial, you will learn how to separate the light sources from the photo and use the separated light sources to create a 4 point star filter.


Make night scenes more glamorous with this Photoshop effect that generates dazzling star effects from light sources. In this Photoshop tutorial, you will learn how to separate the light sources from the photo and use the separated light sources to create a 4 point star filter. Before and After Star Filter Photoshop Effect
Original Image
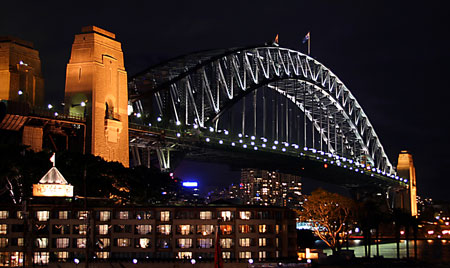
Star Filter Photoshop Tutorial
The Process with Photoshop
To create this star filter effect with Photoshop, we need to first find the light source to create the star effect from. Once it is created, the light source is blurred diagonally to create the first half of the star. Then, a copy of the light source is duplicated and blurred the opposite direction to complete the star. Once done, it is blended into the photo and tweaked for sharper flares.Step 1
Open a photo into Photoshop. This is the image that will be used for this tutorial:Step 2
First, we need to create a layer with just the light sources. Press Ctrl+J to duplicate the layer or go into the Layer menu and select Duplicate Layer. Double click on the text of the new layer and rename this layer to Lights.Step 3
To find the light sources, we'll simply use the levels tool to filter out everything except for the brightness areas in the photo. Press Ctrl+L to access the Levels tool or open the Image> Adjustments menu and select Levels. In the Levels tool, drag the middle input slider to the very right so that the image becomes posterized.Step 4
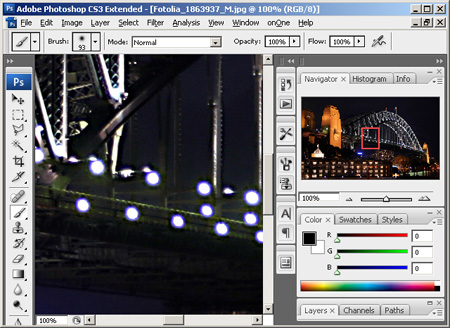
Most of the areas that are not light sources are gone, but we still need to manually erase the areas that are not light sources. Select the brush tool and set the foreground color to black. Then, paint over all the areas that are not light sources. This is what the image used in this tutorial looks like now:http://photoshoptutorials.ws/images/stories/Photoshop%20Tutorials/Photo%20Effects/Star%20Filter/after-erase.jpg
Step 5
Duplicate the layer and change the blending mode to screen. This layer will be used to create the first half of the star.Step 6
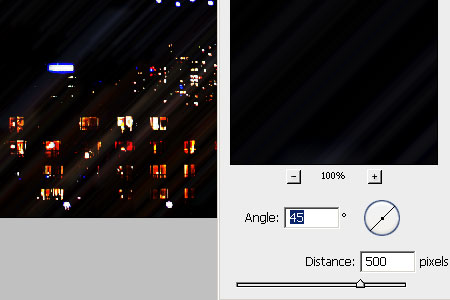
Open the Filter> Blur menu and select Motion Blur. In the Motion Blur window, change the angle to 45º and adjust the distance to your preference of how large you would like the star to be.Step 7
The motion blur is barely visible and the ends are quite square. First, we'll make the ends sharper by applying the Motion Blur filter again. To do this, simply press Ctrl+F or open the Filter menu and select the first listing: Motion Blur. Now we'll make this layer more visible by applying an Auto Levels. Press Shift+Ctrl+L or open the Image> Adjustments menu and select Auto Levels. Once you apply Auto Levels, the flare from the first half of the star should be very visible.Step 8
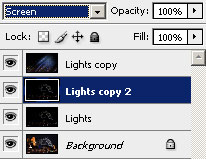
Now we're going to apply the same process to create the other half of the star. Select the Lights layer and press Ctrl+J to duplicate the layer or open the Layer menu and select Duplicate Layer. Change the blending mode of the new layer to Screen.Step 9
Now we'll apply the same Motion Blur filter but with the opposite angle. Open the Filter> Blur menu and select Motion Blur. In the Motion Blur window, simply change the angle value to a negative number by typing a "-" in front of the value and click OK.Step 10
Press Ctrl+F or open the Filter menu and select the first listing: Motion Blur. Then, press Shift+Ctrl+L or open the Image> Adjustments menu and select Auto Levels to apply an Auto Levels. You should now see the effect of the star.Step 11
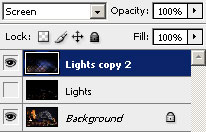
Now we'll enhance the contrast of the star. To begin, select the top layer and press Ctrl+E to merge the layer with the one below it or open the Layer menu and select Merge Down. Then, click on the eye icon beside the Lights layer to hide the layer.Step 12
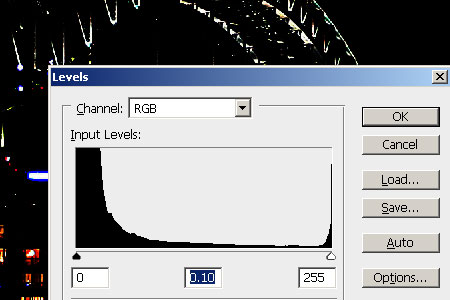
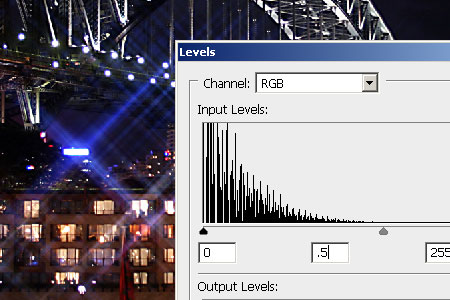
Press Ctrl+L to access the Levels tool or open the Image> Adjustments menu and select Levels. In the Levels tool, drag the middle input silder towards the right to reduce the amount of stars in the image and click OK. A setting of 0.5 for this area is a good starting point for most photos. The effect may seem more subtle now, but don't worry because we'll make it more visible in the next step.Step 13
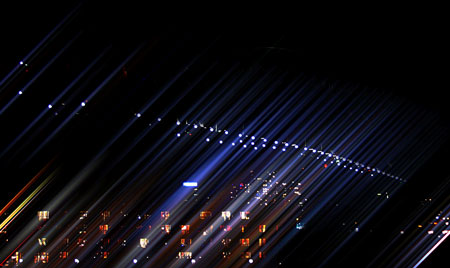
If you want to make the stars brighter, simply perss Ctrl+J to duplicate the layer or open the Layers menu and select duplicate layer. You can repeat this step if until the stars are as bright as you would like it to be.Final Results of Star Filter Photoshop Tutorial
Original Image
Star Filter Photoshop Tutorial
source: photoshoptutorials.ws
0 comments:
Post a Comment