[postlink]http://testlifepsd.blogspot.com/2010/01/airbrushing-natural-smooth-skin.html[/postlink]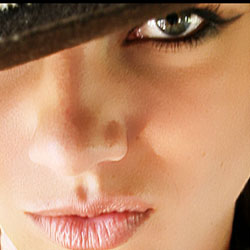 Since the pre-digital era, glamour photos have been airbrushed by skilled photographers to remove imperfections on the skin. Now, with advance image editing software such as Adobe Photoshop, airbrushing can easily be mimiced with realistic results. However, many airbrushing techniques removes too many details causing the skin to look plastic and unrealistic. In this tutorial, we'll teach you an effective Photoshop technique to simulate airbrushing without losing the texture.
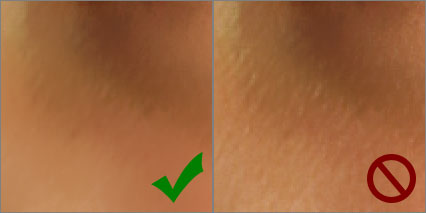
The tiny bumps of the skin is most visible on the neutral tones of the skin and least visible on the dark tones of the skin. To simulate this natural effect, we'll add a layer mask that will reduce the visibility of the bumps on the darker tones of the image. Add a layer mask by clicking the button or by going to the Layer> Layer Mask menu and selecting Reveal All.

Tip: Click on the Radius field and press the up and down button to quickly increase or decrease the effect.
Tip: To quickly change the brush size, press the [ key to decrease the brush size and the ] key to increase the brush size.


Since the pre-digital era, glamour photos have been airbrushed by skilled photographers to remove imperfections on the skin. Now, with advance image editing software such as Adobe Photoshop, airbrushing can easily be mimiced with realistic results. However, many airbrushing techniques removes too many details causing the skin to look plastic and unrealistic. In this tutorial, we'll teach you an effective Photoshop technique to simulate airbrushing without losing the texture. Airbrushing - Natural Smooth Skin Photoshop Tutorial
Step 1
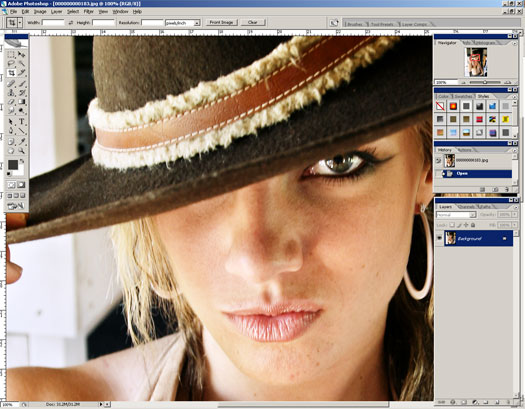
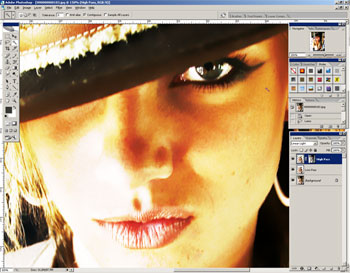
First, go to the File menu and select Open to open a photo you would like to edit. Because we will be working with fine details, it is important that the image is a high resolution so that the details of the skin can be seen. The image I used is a high resolution 10 megapixel image with plenty of skin detail.Step 2
In the next steps, we will be duplicating the layer twice and applying two filters to each of the new layers. Because the image I am working with is a large 31MB photo, processing the filters will be CPU intensive and slow. Before I continue to duplicate the layer, I'm going to use the Lasso tool to draw a selection of the skin and duplicate only that area. This will reduce the amount of pixels to work with and reduce the load on my computer. You don't have to do this if you don't need to. It may be helpful if you don't have a fast computer with lots of RAM or if your image isn't really large.Step 3
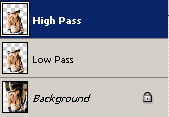
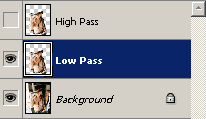
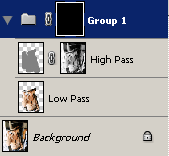
Now, press Ctrl+J or open Layer menu and select Duplicate to duplicate the layer. Do this once more so that you have two layers. Now, rename the top layer to "High Pass" and the middle layer to "Low Pass". As you may have guessed, on the High Pass layer, we'll be applying a high pass filter and on the Low Pass layer, we'll be applying a low pass filter.Step 4
Lets work on the Low Pass layer first. In the Layers palette, click on the eye beside the High Pass layer to hide the layer and select the Low Pass layer that we will be working on.Step 5
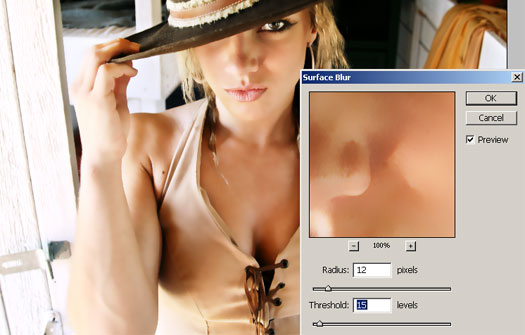
Instead of applying a low pass filter, also known as the gaussian blur filter, we'll be using the Surface Blur filter instead. Select the Filter> Blur menu and choose Surface Blur. The surface blur filter blurs the image but preserves the edges. It is great for smoothing skin without losing the edges. The Surface Blur provides two options:- Radius:
This setting specifies the size or strength of the blur. Use a higher setting for larger images.
"The Radius option specifies the size of the area sampled for the blur."
- Adobe Help Center - Threshold:
This setting allows you to define the area to blur.
"The Threshold option controls how much the tonal values of neighboring pixels must diverge from the center pixel value before being part of the blur. Pixels with tonal value differences less than the Threshold value are excluded from the blur."
- Adobe Help Center
Step 6
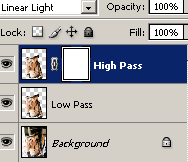
We're done with the Low Pass layer. Now we'll work on the High Pass layer that'll restore the tiny details such as the bumps and pores. Select the layer, click on the eye beside the High Pass layer, and change the layer blending mode to Linear Light.The tiny bumps of the skin is most visible on the neutral tones of the skin and least visible on the dark tones of the skin. To simulate this natural effect, we'll add a layer mask that will reduce the visibility of the bumps on the darker tones of the image. Add a layer mask by clicking the
button or by going to the Layer> Layer Mask menu and selecting Reveal All.Step 7
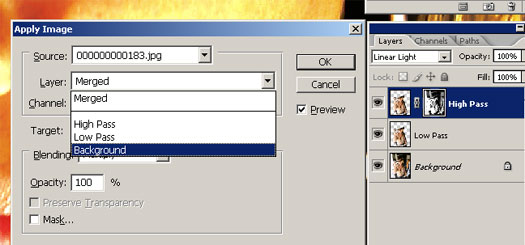
Now we'll use the Apply Image tool to apply a copy of the image in the layer mask. Now we have a layer mask that defines and reduces the effect in those dark areas.Step 8
We're done with the layer mask, so click on the thumbnail of the layer (not the layer mask).Step 9
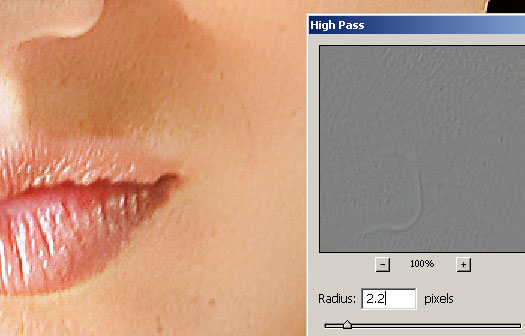
We will be using the High Pass filter next. The next step will require a lot of precise adjustments, so before we proceed, zoom in 100% on somewhere near the skin.Step 10
Expand the Filter> Other menu and select the High Pass filter. In the High Pass filter, adjust the Radius in small increments until the skin looks natural.Tip: Click on the Radius field and press the up and down button to quickly increase or decrease the effect.
"High Pass retains edge details in the specified radius where sharp color transitions occur and suppresses the rest of the image. (A radius of 0.1 pixel keeps only edge pixels.) The filter removes low-frequency detail in an image and has an effect opposite to that of the Gaussian Blur filter."
- Adobe Help Center
Step 11
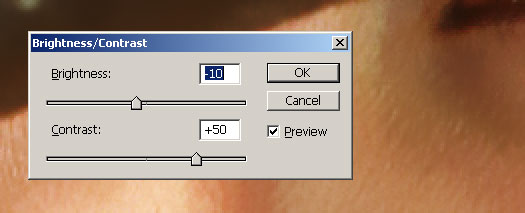
Now we'll go back and tweak the settings of the layer mask. In the layers palette, click on the thumbnail of the layer mask to activate it. Then, go to the Image> Adjustments menu and select Brightness/Contrast. In the Brightness/Contrast tool, increase the contrast and adjust the brightness so that the bumps on the skin is less visible on the dark areas and more visible on the bright areas.Step 12
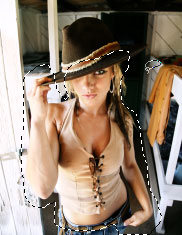
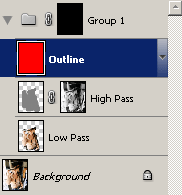
We're done smoothing the skin, but now the whole image is smooth. We need to use a layer mask to erase the effect from the areas that are not the skin. Select the top two layers and press Ctrl+G or go to the Layers menu and select Group Layers to group the layers. Then, add a layer mask by going into the Layers> Layer Mask menu and selecting Hide All.Step 13
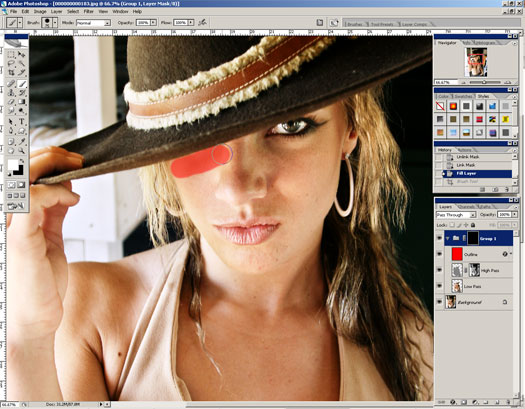
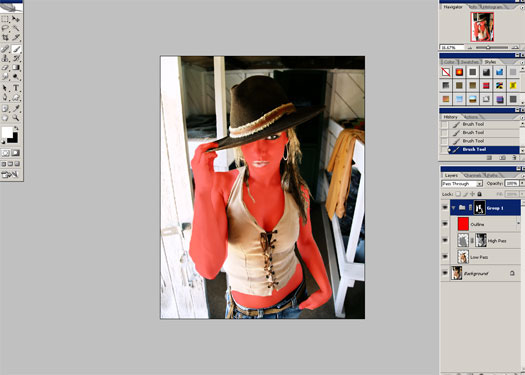
You should now see back the image the way it originally was without the smooth skin effect. We will be painting the layer mask over the skin. But because this effect is subtle, it may be difficult to see where we have painted over. So before we paint the layer mask, add a new layer above the High Pass layer and fill it with the color red. Then, change the opacity of the red layer to 50%.Step 14
Select back the Group layer mask by clicking on the black thumbnail in the layers palette. Select the brush tool and paint over the skin to make the smooth skin effect visible over those areas that you paint. To change the setting of the brush, right mouse click anywhere and the Brush settings will appear. Start with large diameter and a hardness about 50. Then, fill in the tiny spots with a smaller brush. You don't have to be too precise with this step. Minor flaws will not be noticeable.Tip: To quickly change the brush size, press the [ key to decrease the brush size and the ] key to increase the brush size.
Step 15
Delete the red fill layer when you're done.Final Results
Rollover the images to see the before and after effect. It may take awhile for the images to load. source: photoshoptutorials.ws
0 comments:
Post a Comment