[postlink]http://testlifepsd.blogspot.com/2010/01/diffusion.html[/postlink]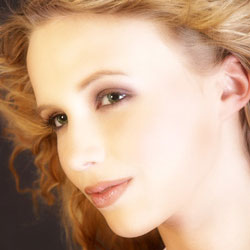 Add a strong diffusion glow effect. This Photoshop effect makes light skin glow while keeping dark areas, such as hair, dark.


Add a strong diffusion glow effect. This Photoshop effect makes light skin glow while keeping dark areas, such as hair, dark. Adding the Diffusion Effect
Many experienced Photoshop users may already know about this popular effect. For those who don't know, you can apply a quick version of this effect by duplicating the layer, changing the blending mode to Screen, and applying a Gaussian Blur to the new layer. This tutorial goes further by showing you how to filter out the effect from dark areas and how to restore edge sharpness.Step 1
Open a photo to edit.Step 2
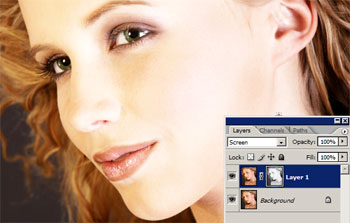
Duplicate the layer (Layer> Duplicate or Ctrl+J) and change the blending mode of the new layer to Screen.Step 3
Add a layer mask to the top layer (Layer> Add Layer Mask> Reveal All).Step 4
Make sure the layer mask is activated. The thumbnail of the layer mask in the layers window should have a white border around it. If it doesn't, click on the thumbnail to activate the layer mask.Step 5
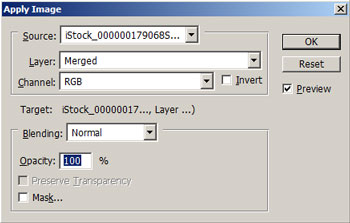
With the layer mask activated, open the Apply Image tool (Image> Apply Image). The default settings should be fine. Simply click OK to continue.Step 6
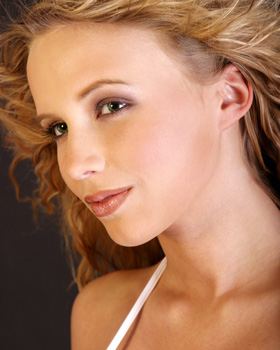
Your image should now have a similar glow effect:Step 7
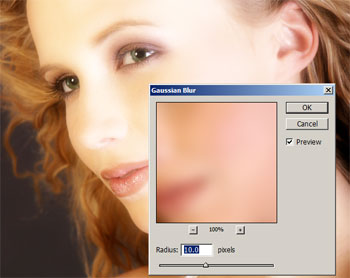
Click on the thumbnail of the top layer to deactivate the layer mask. With the top layer selected, open the Gaussian Blur filter tool (Filter> Blur> Gaussian Blur). Make sure that the preview checkbox is checked and increase the radius slider until the desired effect is achieved.Restore Edge Sharpness
In this portion of the tutorial, you'll learn how to restore the edge sharpness. This portion of the tutorial is optional but we recommend that you follow it on your first try so that you'll be able to see the difference.Step 8
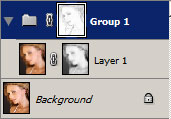
We need to add another layer mask but Photoshop will only allow one raster layer mask per layer. To get around this, we'll simply group the layer (Layer> Group Layers or Ctrl+G) and add a layer mask (Layer> Add Layer Mask> Reveal All) to the new group created.Step 9
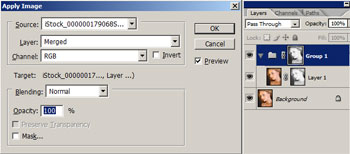
Click on the thumbnail of the new layer mask. With the layer mask selected, use the Apply Image tool to apply the entire image to the layer mask. The default settings should be fine.Step 10
Apply a Find Edges filter (Filter> Stylize> Find Edges).Step 11
Use the Zoom tool (Z) and zoom in around 300-400% to an a edge. If you look closely at your image, you may be able to notice a thin black outline on the edges. The line is caused by the Find Edges filter.Step 12
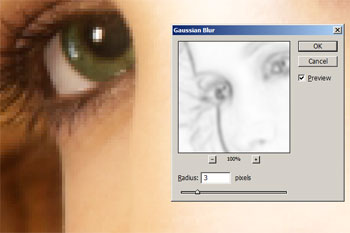
To remove the outline, we'll simply blur the layer mask with the Find Edges filter applied just a tiny bit. Open the Gaussian Blur filter tool (Filter> Blur> Gaussian Blur), set the radius to 3 pixels and click OK.Step 13
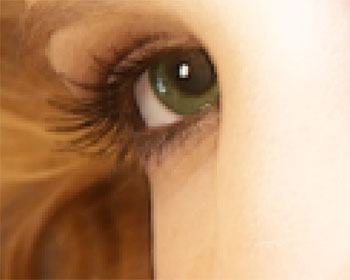
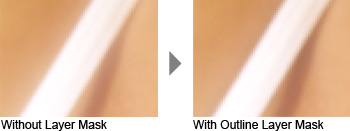
Hold shift and click on the thumbnail of the top layer mask to view the image without the layer mask and undo to revert. You'll notice that the layer mask increases sharpness but reduced the diffusion glow effect. If you want to keep the diffusion glow effect, simply disable the layer mask by holding the Shift key and clicking on the thumbnail of the top layer mask.Final Results
source: photoshoptutorials.ws
0 comments:
Post a Comment