In Photoshop, Transform is used to scale, rotate, skew, and just distort the perspective of any graphic you’re working with in general. This tutorial will teach you how to use Transform to adjust your images.
Scaling Graphics
One of the most basic transformations Photoshop is capable of is scaling a graphic. Scaling allows you to enlarge or shrink a graphic around a reference point. To scale a graphic, we go to Edit > Transform > Scale.
A set of handles will appear around our selected elements in the document (such as layers, or shapes). By moving anyone of these handles, we can adjust the size of the object. To apply the transformation, hit Enter.
Constraining Proportions while Scaling
Often times, you’ll find it necessary to constrain the proportions of your objects when scaling. This can easily be achieved by Holding Shift while dragging a transformation handle. You can additionally scale from the center reference point by Holding Alt (or Option on Mac OS), or combine the two by holding shift and alt at the same time while scaling.
Rotating Objects in Photoshop
To Rotate an Object in Photoshop, go to Edit > Transform > Rotate. Handles will appear as they did with a Scaling Transform, but instead of dragging one of these, go just outside of the object until you see a curved arrow rotate icon.
At this point, simple drag left or right to rotate the selected object. Once again, you must finish applying the transformation by pressing Enter.
Be Precise with your Rotations!
You can rotate in 15 Degree Increments with this useful little shortcut. While you’re rotating an object, simply hold down the shift button.
Skew, Distort, and Perspective Transformations
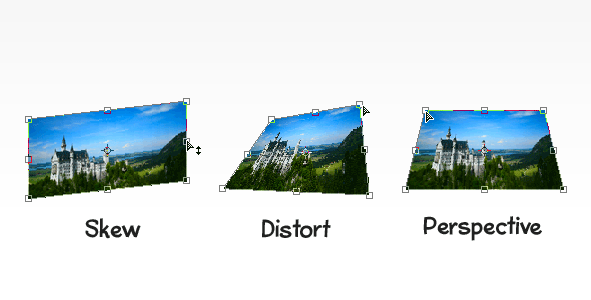
The next 3 transformations are all similar, because they are all controlled by dragging handles. That is not to say that they are used to do the same thing, they simply all operate in the same manner. You can apply a Skew, Distort, or Perspective Transformation from Edit > Transform.
Distort: Distort transformations allow you to stretch an image in ANY direction freely.
Perspective: The Perspective transformation allows you to add perspective to an object.

Warping an Object
The Warp Transformation is quite a bit different compared to the other transformations. The entire shape of the object can be modified, making this transformation useful for several different effects. To use a Warp Transformation go to Edit > Transform > Warp. A Mesh will appear over your object that you can adjust by dragging control points, lines, or any other area inside of it. You can additionally apply a preset warp from the options bar.


0 comments:
Post a Comment