[postlink]http://testlifepsd.blogspot.com/2010/01/keying-green-backdrops.html[/postlink] Seperate objects from green backdrops with presicion and control. Learn how to mask fine strands of hair and a translucent glass cup.

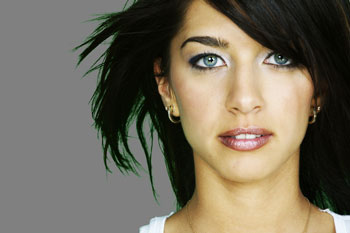


Rollover the image to see a before and after effect.
 glass 44.99 Kb (Right-mouse click> Save As)

undefined

Seperate objects from green backdrops with presicion and control. Learn how to mask fine strands of hair and a translucent glass cup. Identify the Green Backdrop
Before we add layer mask, we need to identify the green areas and create an black and white layer to represent the transparency of the image.Step 1
Open a photo you would like to edit. Or, you may use the photo used in this tutorial (from iStockPhoto). Make sure that the image is in RGB color mode. To switch to RGB color mode, click on RGB Color under the Image> Mode menu. Step 2
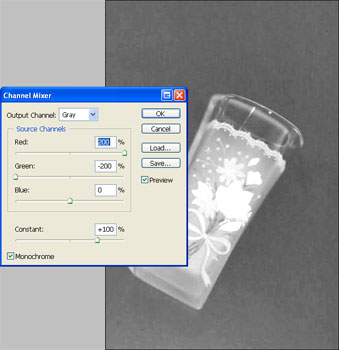
Add a Channel Mixer adjustment layer (Layer> New Adjustment Layer> Channel Mixer). In the Channel Mixer window, check the Monochrome checkbox and set the Red to 200% and the Green to -200%. Don't close the Channel Mixer window yet! Step 3
Now drag the Constant slider towards the right until the object is a 100% white; not gray. Don't go overboard with the constant setting. If the constant is set too high, the images' edge detail will be loss. Step 4
You'll notice that after apply the Channel Mixer adjustment layer, the green areas are not completely black. If we leave this alone, the greens will only be 50% transparent instead of 100% transparent. To fix this, select the Background layer and open the Hue/Saturation tool (Image> Adjustments> Hue/Saturation or Ctrl+U). In the Hue/Saturation tool, select Green from the Edit drop down menu and increase the saturation until the green areas turn black. Convert Layer to Mask
Step 5
Before we can add a layer mask to the Background layer, we need to unlock it. To do this, simply double-click on the layer and a New Layer window should appear. The default settings are fine. Click OK. Step 6
Add a layer mask to the layer we have just unlocked (Layer> Add Layer Mask> Reveal All). Step 7
Make sure the layer mask is activated. The thumbnail of the layer mask in the layers window should have a white border around it. If it doesn't, click on the thumbnail to activate the layer mask.Step 8
With the layer mask activated, open the Apply Image tool (Image> Apply Image). We'll be using the default settings in the Apply Image tool so simply click OK unless the settings on your screen is different from the image below. Step 9
Now that we're done converting the Channel Mixer layer into a layer mask, we can delete the Channel Mixer adjustment layer. Remove Green Edge Artifacts
The image is masked, but most likely it will have green artifacts near the edges. Before we can call this project complete, we need to remove those artifacts.Step 10
Create a new layer (Layer> New Layer or Shift+Ctrl+N). In the Layers pallet, move the layer to the bottom. Step 11
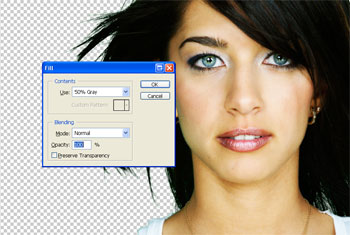
Fill the bottom layer with a 50% gray. To do this, press Shift+Backspace and the Fill tool should appear. Select 50% Gray from the Use drop down menu and click OK. Step 12
With a 50% gray background, the green edges are clearly visible and the background will help us with the next step. Step 13
Select the top layer and open the Hue/Saturation tool (Image> Adjustments> Hue/Saturation or Ctrl+U). Select Green from the Edit drop down menu and set the saturation to -100. Immediately green edge should disappear. Step 14
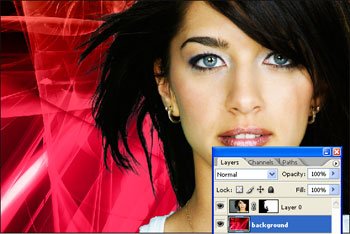
Now that we're done, paste the background you would like to use as the bottom layer. Final Results
Rollover the image to see a before and after effect.
Keying Green Backdrops from Translucent Objects
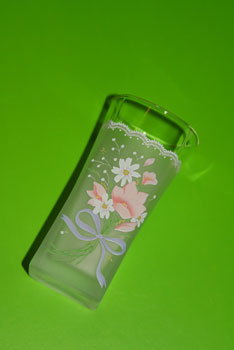
Before we can end this tutorial, we need to learn a few advance tweaks that'll help whenever we encounter problems with other photos. Transparent and translucent objects require more precision than opaque objects. We have provided an image of a glass vase with some transparent areas, some translucent areas, and a backdrop that's not excatly pure green.Step 1
Download the following image and open it inside Adobe Photoshop: Step 2
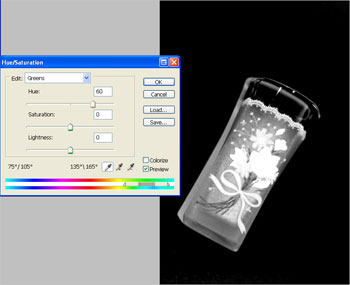
Follow the technique you've just learnt in the previous pages with this tutorial. When you've adjusted the Channel Mixer adjustment layer, you'll notice that the background isn't black. This is because the backdrop that was photograph isn't close enough to a 100% green. Step 3
To fix this, select the layer with the photo and open the Hue/Saturation tool (Image> Adjustments> Hue/Saturation or Ctrl+U). Select Greens from the Edit drop down menu and adjust the hue until the background turns black. The hue you set should be around 60. Step 4
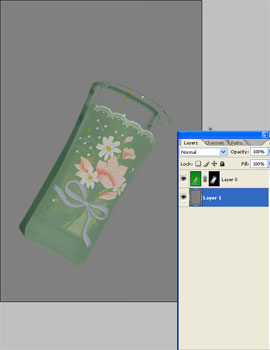
Now that we have the green backdrop fixed, convert the channel mixer adjustment layer into a layer mask and add a 50% gray background. If you don't remember how to do this, refer back to the instructions on page 2. Step 5
You'll notice that some parts of the glass are still green. To fix this, activate the layer with the photo and use the Hue/Saturation tool (Image> Adjustments> Hue/Saturation or Ctrl+U) and select Greens from the Edit drop down menu. Step 6
Experiment with the sliders near between the two rainbow gradient bars. These sliders specify the color range that is being edited. The gray bar between the sliders indicate the the range and the outside two sliders specify faded range.Try to adjust these sliders so that the green disappears. You'll notice that if the color range gets expanded more into the yellow areas, the greens will disappear. I simply moved the 2nd slider towards the left to achieve this.undefined
Final Results
source: photoshoptutorials.ws
0 comments:
Post a Comment