[postlink]http://testlifepsd.blogspot.com/2010/01/velvia.html[/postlink]Simulate the effects of Fujifilm Velvia film. The Fujifilm Velvia film is a professional photography reversal film popular for its brighter colors and higher contrast. Like Velvia film, this Photoshop effect is great for landscape photos but may oversaturate skin tones.
Make sure that the image is in RGB color mode. To switch to RGB color mode, click on RGB Color under the Image> Mode menu.
Output Channel: Red
Red: 150%
Green: -25%
Blue: -25%
Output Channel: Green
Red: -25%
Green: 150
% Blue: -25%
Output Channel: Blue
Red: -25%
Green: -25%
Blue: 150%


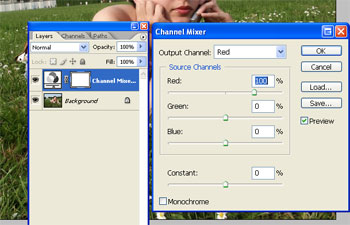
Boosting Colors using the Channel Mixer
The first and most dramatic process is to boost the intensity of the colors.Step 1
Open a photo you would like to edit. Or, you may use the photo used in this tutorial (from iStockPhoto).Make sure that the image is in RGB color mode. To switch to RGB color mode, click on RGB Color under the Image> Mode menu.
Step 2
To boost the colors, we'll be using the Channel Mixer tool. Add a Channel Mixer adjustment layer (Layer> New Adjustment Layer> Channel Mixer). Step 3
In the Channel Mixer tool, select Red in the drop down menu and increase the red to 150%. To balance the colors in the channel we just edited, we need to reduce the green and blue channels by 25%:Output Channel: Red
Red: 150%
Green: -25%
Blue: -25%
Step 4
Repeat the above step for the green and blue channelsOutput Channel: Green
Red: -25%
Green: 150
% Blue: -25%
Output Channel: Blue
Red: -25%
Green: -25%
Blue: 150%
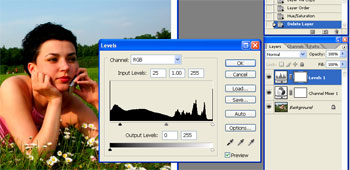
Step 5
Click OK and the colors of your image should be brighter and move vivid. Increasing Contrast
This simple process will help immitate the contrast of velvia film.Step 6
Add a Levels adjustment layer (Layer> New Adjustment Layer> Levels).Step 7
In the Levels tool, drag the black input slider right until your desired contrast level has been achieved. Final Results
Rollover the image to see the before and after effect.source: photoshoptutorials.ws
0 comments:
Post a Comment