Materials Needed:
- You may need Photoshop’s Grass Brush
- Vector Assets
Step 1: Create a New Document
Create a new Photoshop document (file>new) at any size you would like. I suggest giving the file a name such as Autumn. For this tutorial I created one at 1920×1200 (72 dpi) which would be a great resolution for a wallpaper.
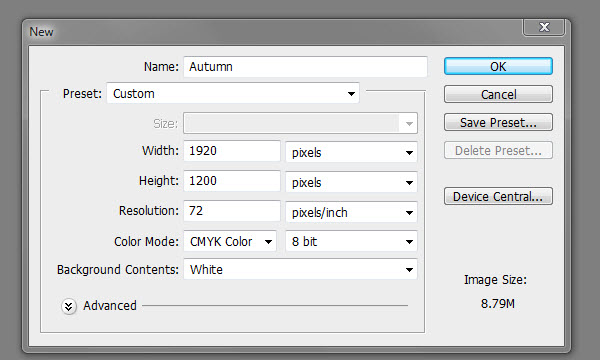
Step 2: Create a Background
Unlock your background layer by double clicking the background layer. Make sure to rename it from Layer0 to background.Double click on the background layer to open up the Layer Style, then select gradient overlay. The gradient overlay should be from #fcef87 to #fe9f09.
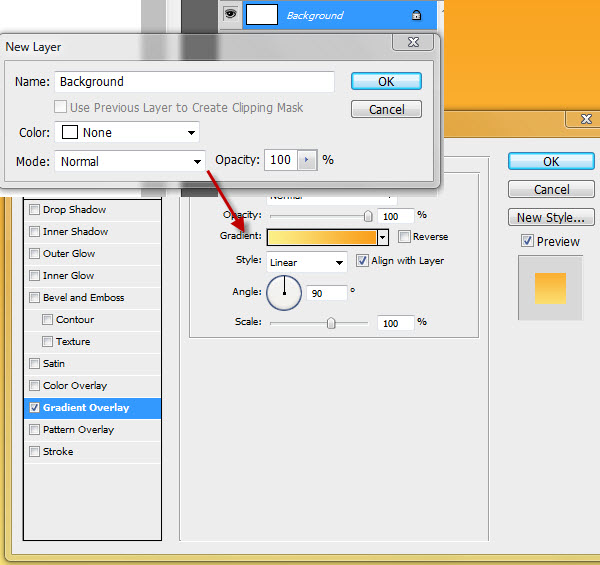
Step 3: Add The Vector Objects
Open the up the file Vector.psd I have made for you in Photoshop.
Drag the layers “Cloud L” and "Cloud R" into the Autumn file. Then resize each layer (Ctrl⁄Cmd + t) to the appropriate size for your resolution.
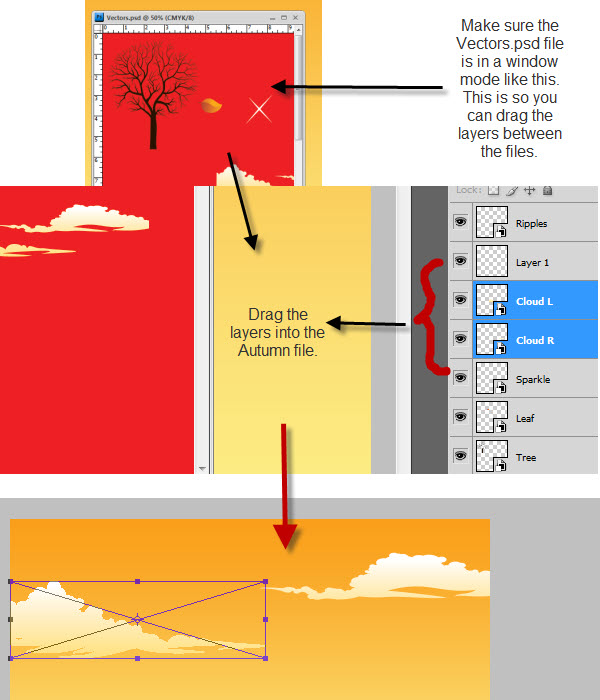
Vectors
I have made the vector.psd as sample layers for your vectors but you can always make your own vectors using Photoshop or Illustrator.
Smart Vector Layers
If you notice the layers with the objects are Smart Vector Objects, this means that they don’t depend on a bitmap but rather vector. This means you can make the objects as large as you want without distorting the image.
DO NOT!
You can’t just simply copy the content of each layer because this is a special vector layer! You MUST drag the layers into the autumn.psd file we are working on!
Step 4: Create a Hill
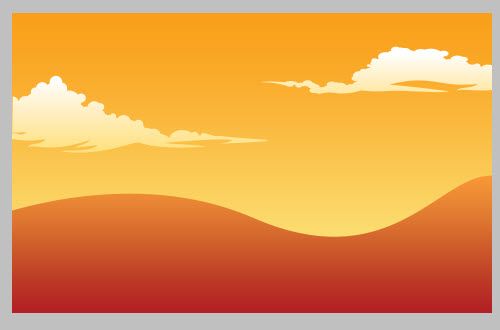
Create a new layer (layer>new>layer) and rename it to hill. Then grab your pen tool and make a closed wave like structure.
Right click on the path and select fill path. Black is fine for now.
Double click on the hill layer and select on Gradient Overlay. The gradient should go from #b30100 to #fe9833. Select ok then right click on the path and select delete path.
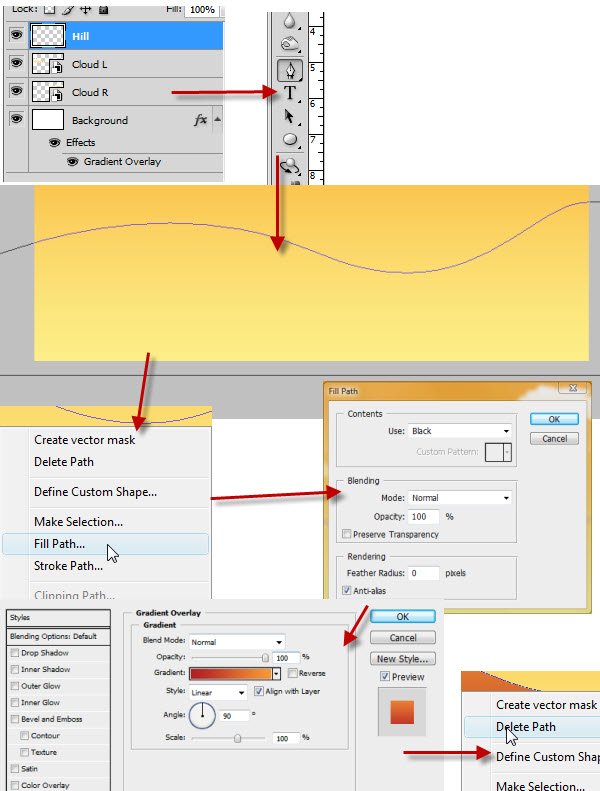
Your image should look something like this:
Step 5: Adding a Pond
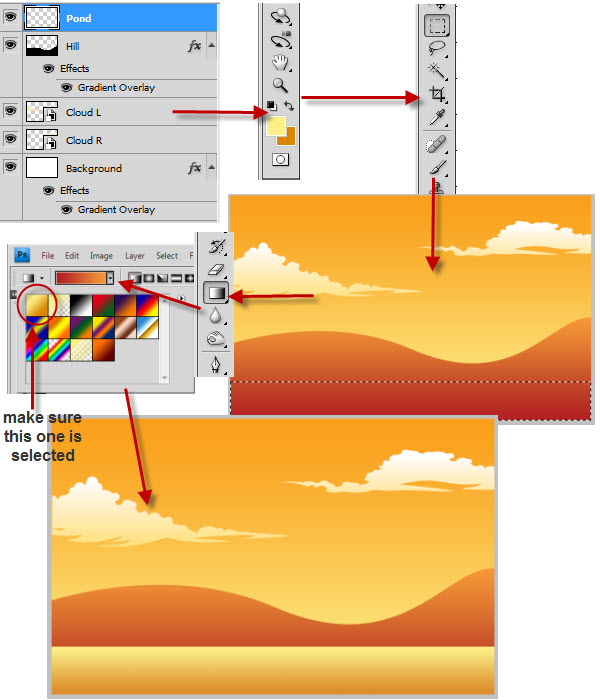
Create a new layer and rename it pond. Make sure that your foreground color is #fcef87 and your background color is #db8500 and, using the Rectangular Marquee Tool (M), make a rectangle underneath the hill.
Select the Gradient Tool (G) and make sure that the gradient at the top left matches your foreground and background color. Then drag the gradient tool from bottom to top. Then deselect (Ctrl/Cmd +D) the selection we made with the marquee tool.
Step 6: Creating a Tree and Some Grass
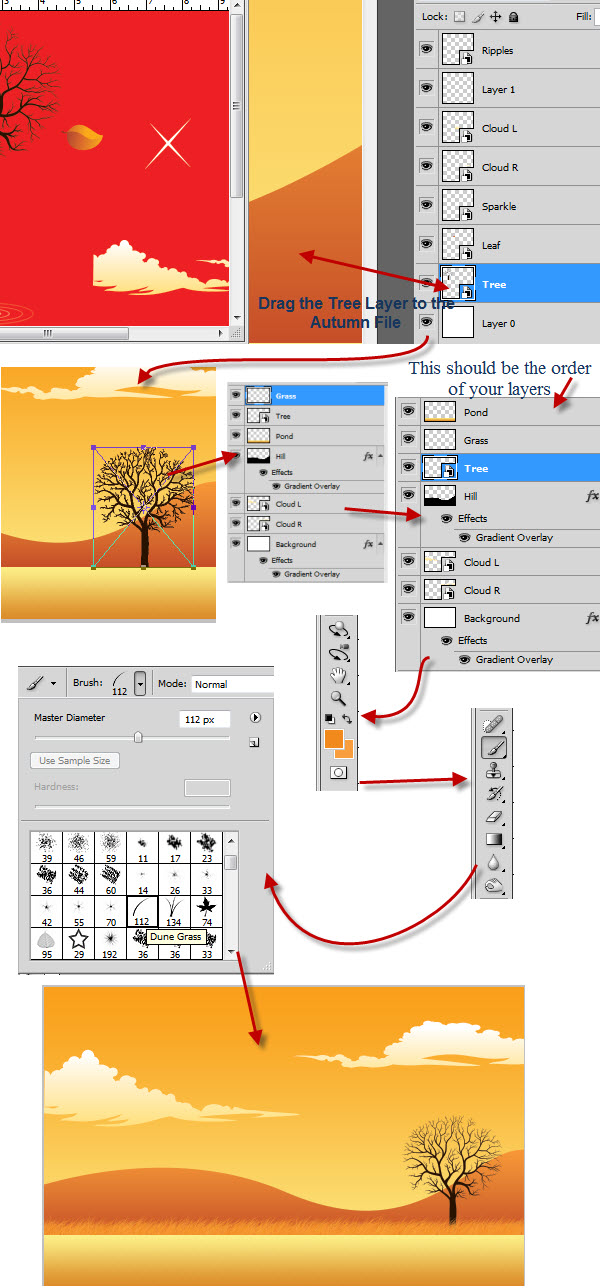
Then drag the Tree layer from the Vector.psd file to our Autumn file, the same way you did for the clouds layers.
Once you have properly placed and resized using the Free Transform Feature(Ctrl/Cmd +t) the tree layer in the Autumn file create a new layer and rename it to grass. Drag the grass layer under the pond layer and drag the tree layer under the grass layer.
Select the Brush tool (B) selected and make your foreground color set to #f18a1c and your background color #f89e3d. If you have CS4 select the Dune Grass brush, if not download this brush here. Then bush on the grass layer and make sure to go a bit under the pond layer.
Step 7: 2-10 Blending The Grass
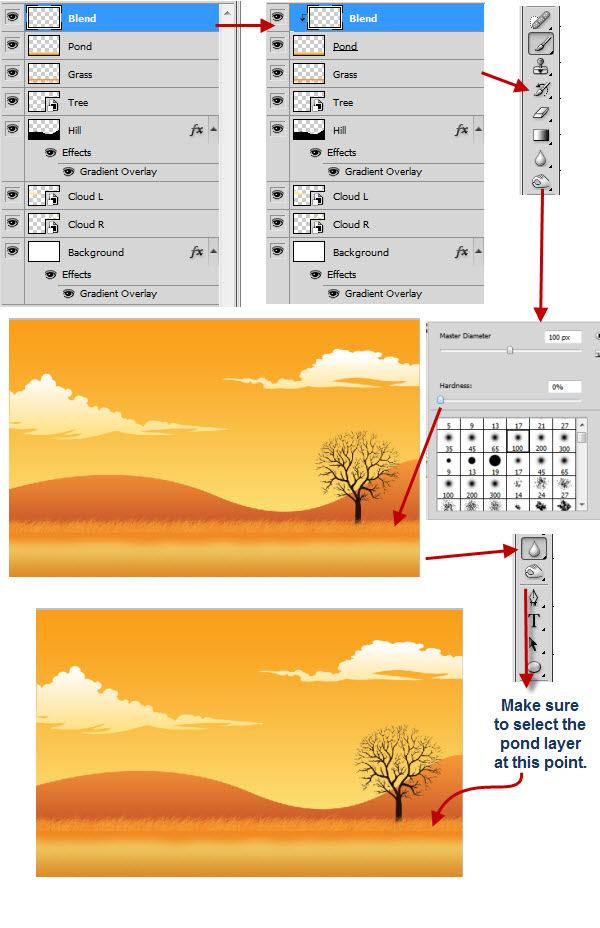
Create a new layer and name it Blend. Merge the Blend layer and the pond layer by holding the Alt button and going between the boarder of the two layers. You should see an icon with a black and white circle, when you do click on your mouse. Then grab a soft brush in the Brush tool (B) and paint with your brush near the top of the Blend layer.
Then Grab the Blur Tool and select the Pond layer and start to blur the edges.
Step 8: 2-10 Word Step Description
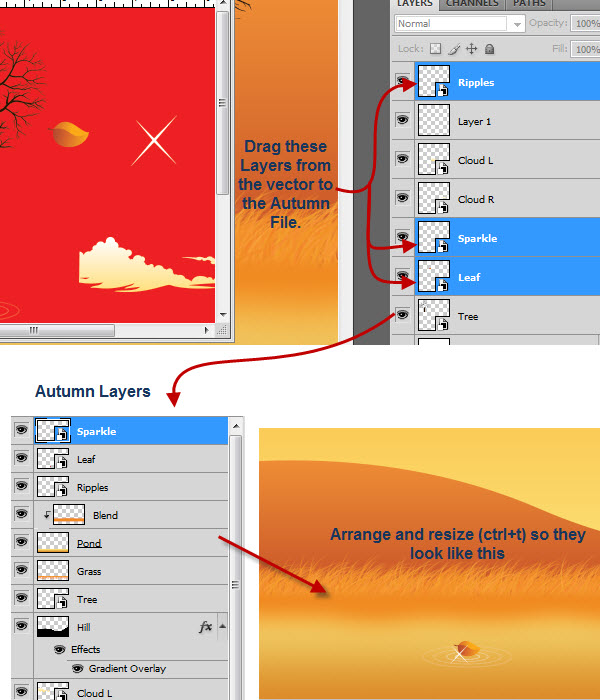
Move the Ripples, leaf, and sparkle layers (in that order) from the Vector.psd file to the Autumn file. And place it on top of the pond like so:
Step 9: Adding Leaves
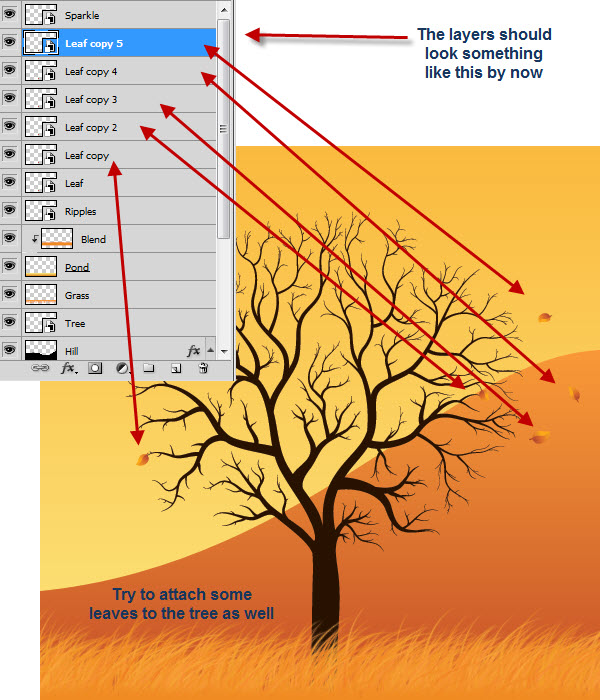
Duplicate the Leaf layer (Layer>Duplicate Layer) as many times as you would like and spread each layer around the tree.
Leaves
Try to Free Transform (Crtl/Cmd+t) the leaf layers and spin them around so they look like they are blowing away. I domonstrate the results in the image below. It is good to experiment in these situations.
Step 10: Adding Sparkles
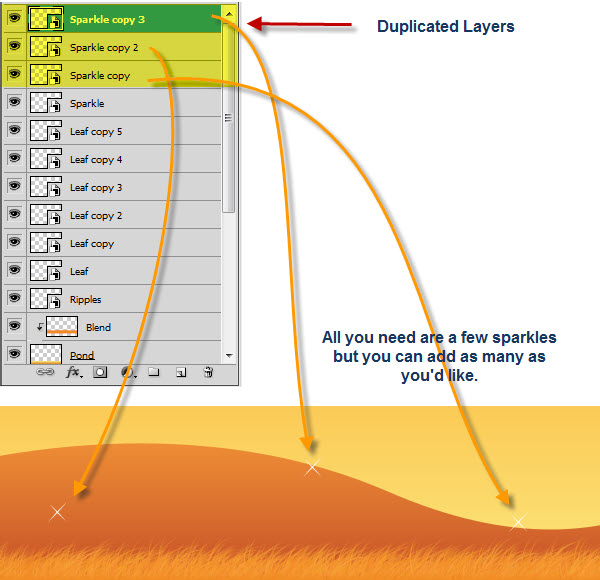
Duplicate a couple of the Sparkle layers and resize and spread them near the Hills.
Step 11: Adding Some Glow
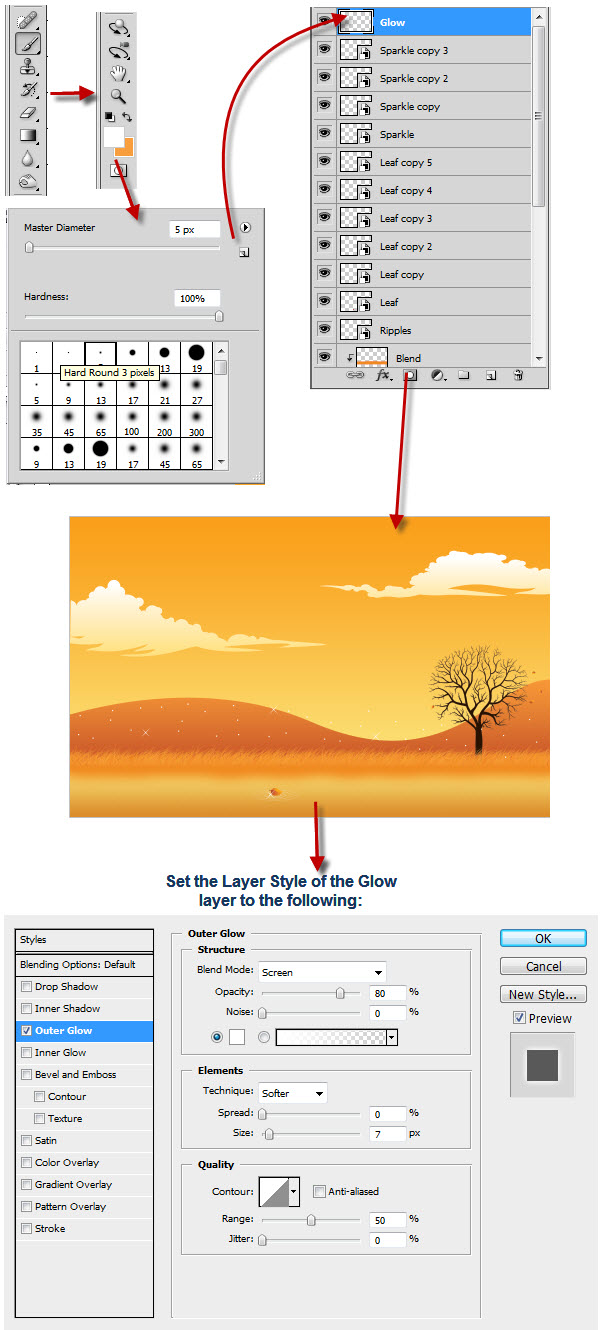
Select the Brush Tool (B) and create a new layer called Glow. Make sure that your foreground color is white #ffffff and the brush is a small circle size like 4. The hardness should be 100%. With those attributes make dots on the Hill area.Change the Layer Style of the Glow layer
Optional Additions To Your Picture
For a darker look you can go to Layer>New Adjustment Layer>Photo Filter and select Color. Make the color #000000(black) or a dark color and play around with the density and opacity to your liking. You can also Flatten the image and sharpen the image by going to Filter>Sharpen>Smart Sharpen.
0 comments:
Post a Comment