Photoshop offers a large selection of tools and features for retouching photographs and images. In this tutorial, you’ll learn how to use the common touch-up tools.
Spot Healing Brush Tool
The Spot Healing Brush is primarily used to quickly remove blemishes, imperfections or other unwanted elements from an image. To use it, paint over an imperfection you’d like to get rid of using a suitable brush (brushes can be selected and modified in the options bar). The Spot Healing Brush Tool will automatically try to repair the imperfection by sampling the surrounding area.
Healing Brush Tool
The Healing Brush Tool performs a similar function to the spot healing brush tool mentioned above. Instead of automatically trying to determine the lighting, shading, and texture from the surrounding area, the healing brush tool lets you manually select a source, and then paint over an imperfection. To select a source, hold alt and click the desired part of the image. Then paint over the area you wish to replace. As with the Spot Healing Brush Tool, settings such as brush size can be controlled in the options bar.
Patch Tool
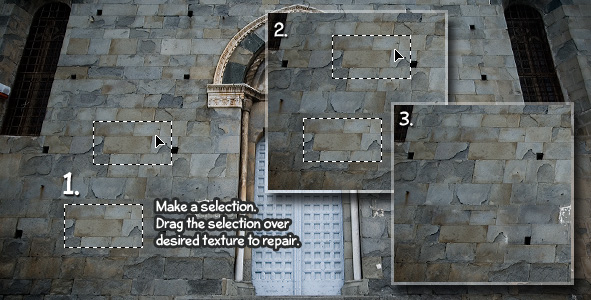
With the Patch Tool, an entire area can be repaired with pixels from another area. Just like the healing brush tool, the patch tool will try to correct lighting, shading, and texture. To use the patch tool, first draw a selection with any of the selection tools (or the patch tool, which will function as a lasso tool). Then, using the patch tool, drag that selection over the destination you want to use to repair that area.

Clone Stamp Tool
The final tool we’ll cover in this tutorial is called the Clone Stamp Tool. The Clone stamp tool allows you to paint with a sample of an image.
Blur & Sharpen Tools
The Blur and Sharpen Tools allow us to manipulate edges by making them softer or harder. They do exactly what you would expect them to do; blur and sharpen.
Both tools have similar attributes such as Strength (increase or decrease the strength of the tool, or how much it will blur) and the brush, all of which can be adjusted in the Options Bar for each tool. To use the blur or sharpen tool, simply set up the brush to your specification, hold down the mouse button, and hover over the areas you’d like to alter in your image.
You should have a pretty good feel of the basic retouching tools by now. The next step in mastering Photoshop is usually learning how to use the painting tools to compliment your photo remastering abilities!
source: tutorial9.net


0 comments:
Post a Comment