
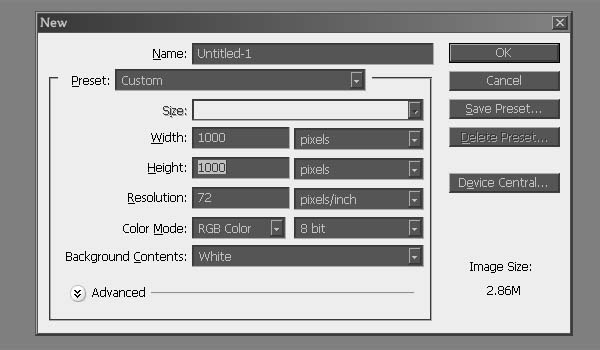
Step 1: Creating a New Document
Create a new document with 1000 on 1000 pixels and a white background.
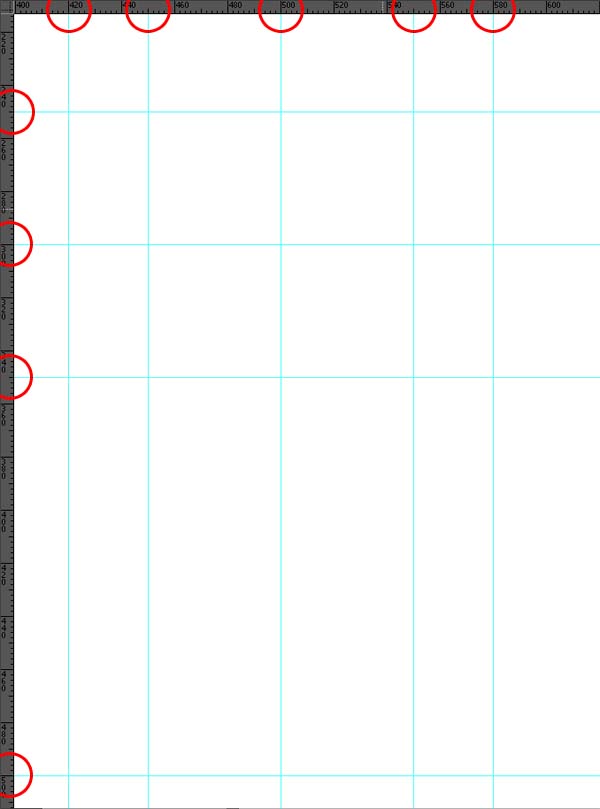
Step 2: Setting Up Basic Guides
Because it makes it easier to draw shapes in the right proportions we’ll set up some basic guides. Activate the rulers (Ctrl + R) if you don’t have them already activated and set their unit to pixels (right-click on one of the rulers to do so), then add guides at the following coordinates:
- Horizontal axis:
- 420px
- 450px
- 500px
- 550px
- 580px
- Vertical axis:
- 250px
- 300px
- 350px
- 500px
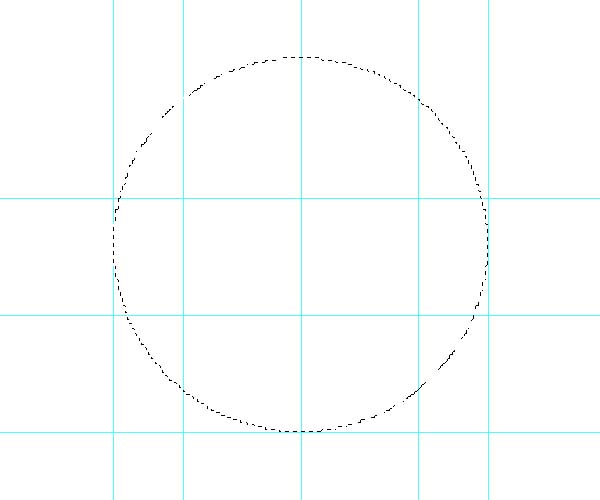
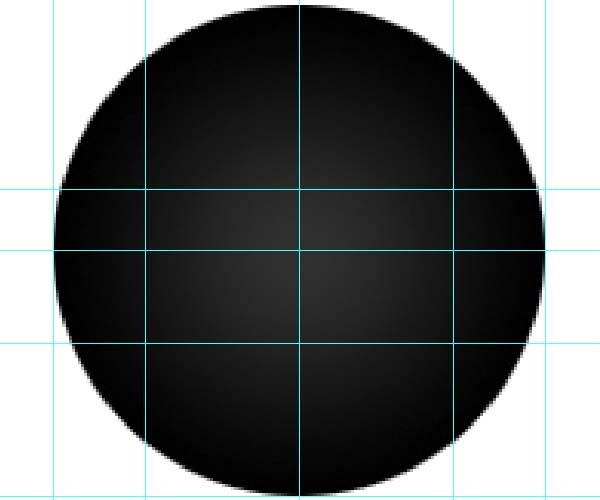
Step 3: Getting Started
Start by selecting the Elliptical Marquee Tool (Shift + M) and hold down the Shift-key to create a 160px high and wide circular selection. The bottom of your selection should touch the guide at 350px, whereas its sides should touch the 420px guide to the left and the 580px guide to the right.
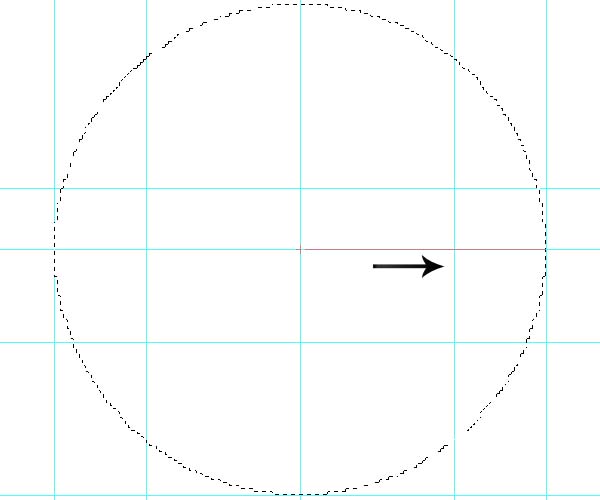
Step 4: Adding a Gradient
Create a new layer (Ctrl + Shift + N) and name it “Hat Bottom” and select the Gradient Tool (Shift + G). Choose #303030 and #000000 as your gradient colors, select Radial as Gradient Style and leave the other settings on their default. Now create the radial gradient from the center of the circle (you should add another horizontal guide at 270px) to its border.

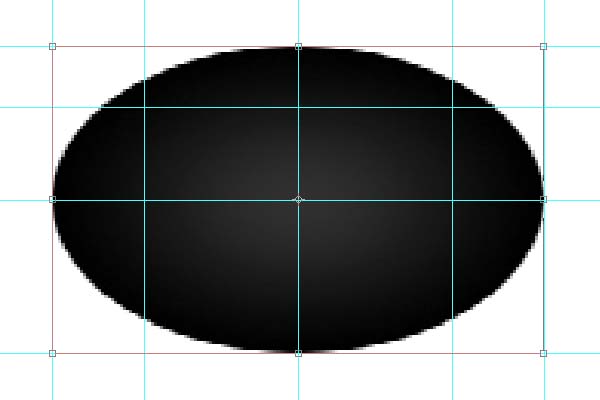
Step 5: Transform the Circle
Deselect Everything (Ctrl + D) and go to Edit > Free Transform (Ctrl + T) in order to transform your newly created circle. Small it down until it is only 100px high (its top should touch the 250px guide now).
Remark:
In case you are wondering why we didn’t create an 160px on 100px ellipse directly and applied a gradient then, there is a simple explanation: If we would have chosen the just mentioned method we would have ended up with an ellipse with a circular gradient, whereas, with our method, we got an ellipse with an elliptic gradient, way better.
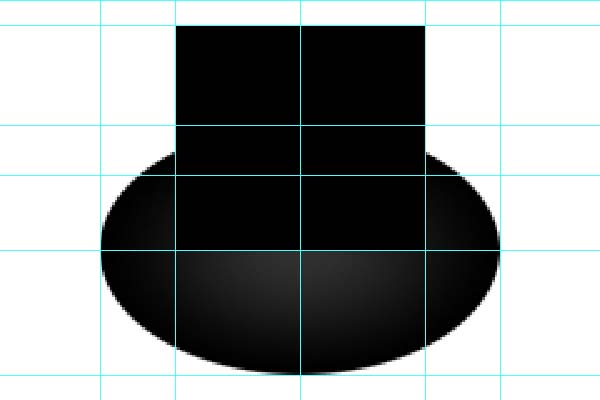
Step 6: Adding a Rectangle
Now select the Rectangle Tool (U) and draw a 100px wide and 90px high rectangle. Its bottom should touch the center of our ellipse (at the 300px guide) and its sides the 450px and 550px guides. Name the shape “Hat Body”.
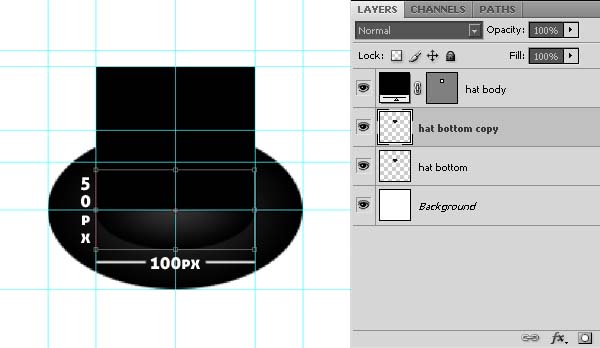
Step 7: Duplicating the Ellipse
Duplicate the “Hat Bottom” shape by right-clicking on the layer and selecting Duplicate Layer (Ctrl + J) and go once again to Edit > Free Transform (Ctrl + T). Reduce its height to 50px while holding the Alt-key and 100px for its width (keep your finger still on the Alt-key). Rename the layer as “Hat Body Bottom”.
Step 8: Finishing the Basic Hat
Duplicate the layer you just created and move it 90px up (so that its center touches the top of the “Hat Body” shape). You also have to move the layer itself above the “Hat Body” layer in the Layers Palette. Now we already have a basic hat (although it’s admittedly still ugly).

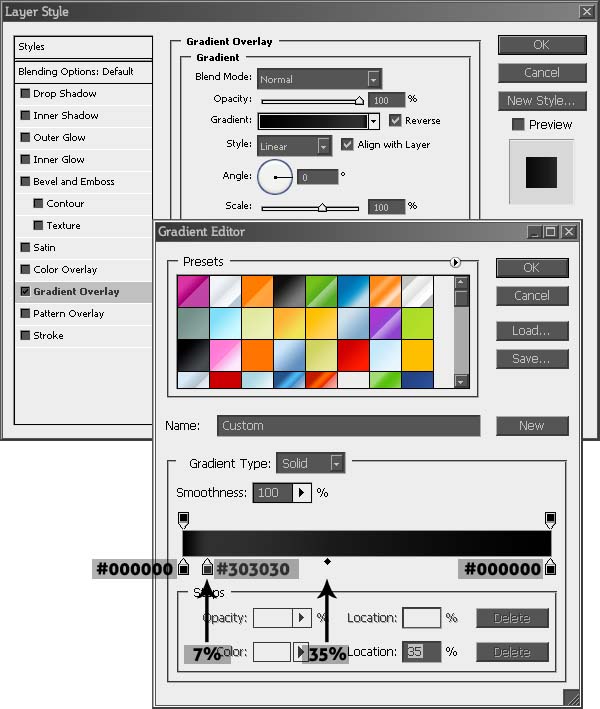
Step 9: Styling the Hat
Time for some layer styles. Right-click on the “Hat Body” layer and select Blending Options. Go to Gradient Overlay and use the settings shown below.
Step 10: Copy the Styling
Right-click on the “Hat Body” layer and select Copy Layer Style. Then right-click on the “Hat Body Bottom” layer and select Paste Layer Style. If you want to you can deactivate the guides (Ctrl + ![]() for a moment and have a look at the hat (not so ugly anymore, is it?).
for a moment and have a look at the hat (not so ugly anymore, is it?).

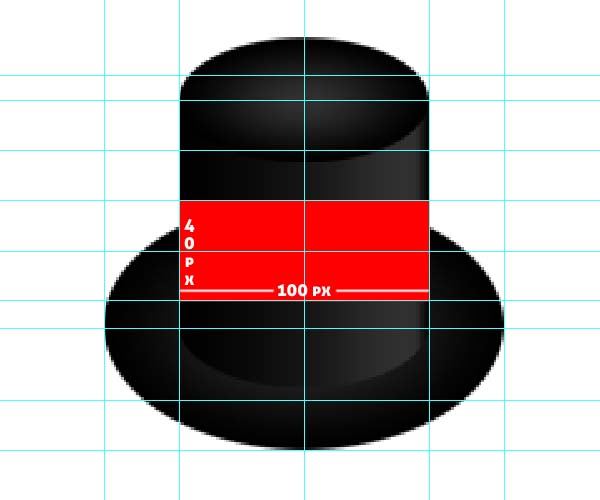
Step 11: Creating the Ribbon
Time to create the hat’s red ribbon. Reactivate the guides in case you hid them (again Ctrl + ![]() and create two new horizontal ones at 230px and 290px. Now select the Rectangle Tool (U) and create a 100px wide and 40px high rectangle. Its bottom should be at the 290px guide and the sides at 450/550px. Give it a red color for now, so it stands out a little better.
and create two new horizontal ones at 230px and 290px. Now select the Rectangle Tool (U) and create a 100px wide and 40px high rectangle. Its bottom should be at the 290px guide and the sides at 450/550px. Give it a red color for now, so it stands out a little better.
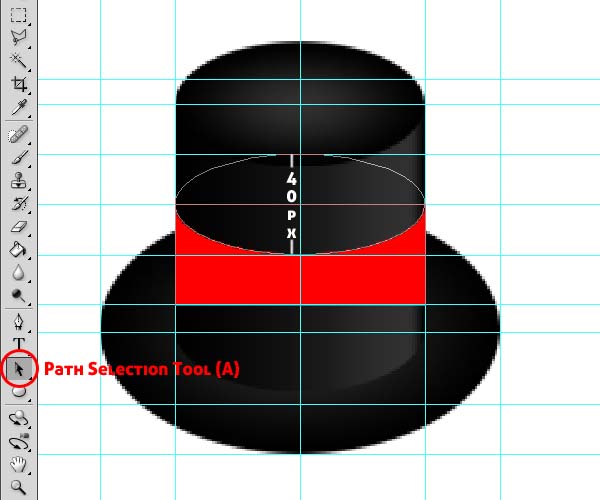
Step 12: Evolving the Ribbon with the Path Selection Tool
Now you have to use the Path Selection Tool (A). Click on the newly created shape (the path’s outlines should appear now) and select the Ellipse Tool (Shift + U). This next step might be a little bit complicated if you are new to Photoshop, but after a few tries you should definitely be able to figure it out. Move the cursor (still with the active Ellipse Tool) over the intersection of the vertical 450px guide and the horizontal 230px guide, then hold down the Alt-key and start creating an ellipse. Now let go of the Alt-key, but not of the mouse button. The ellipse will jump back to its original start point and you only have to create a 40px high and 100px wide ellipse. It will touch the 270px guide at the bottom and once more the 450/550px guides at its sides. By holding down the Alt-key at the beginning of the creation of the ellipse we subtracted the elliptic shape from our rectangle.
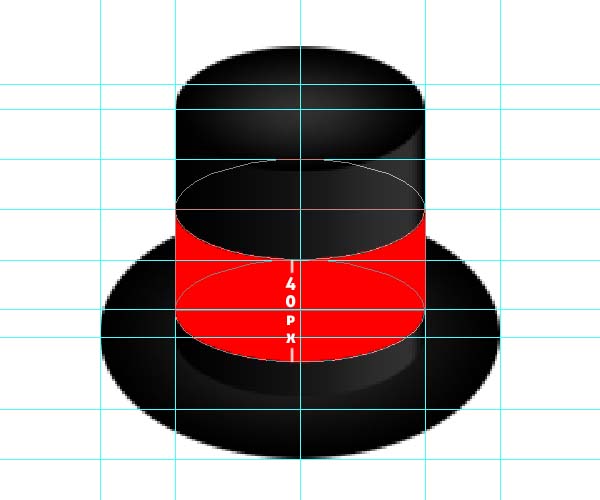
Step 13: Finishing the Ribbon Shape
Now you move your cursor over the intersection of the horizontal 270px guide and the vertical 450px guide. This time you have to hold down the Shift-key while you start drawing an ellipse. Once again, let the Shift-key go, but keep the mouse button pressed. Finish drawing the ellipse so that it is 40px high and 100px wide. Because we held down the Shift-key this time, we added the ellipse to our rectangle. Now the ribbon shape is ready and you can name it “Ribbon”.
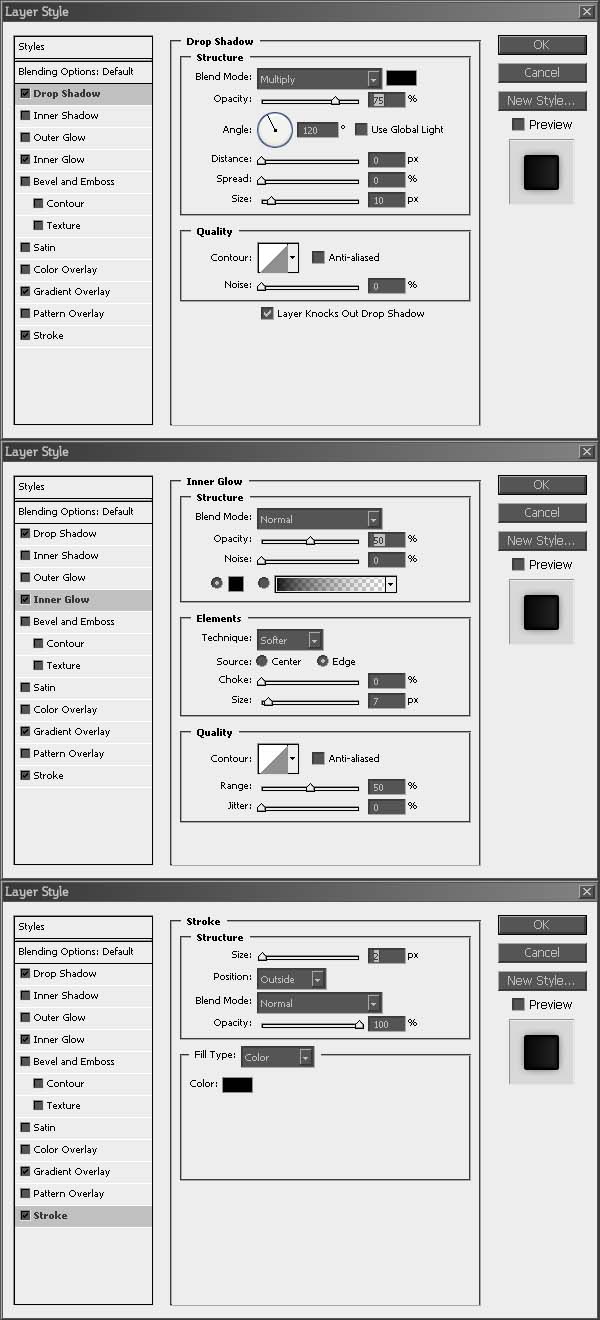
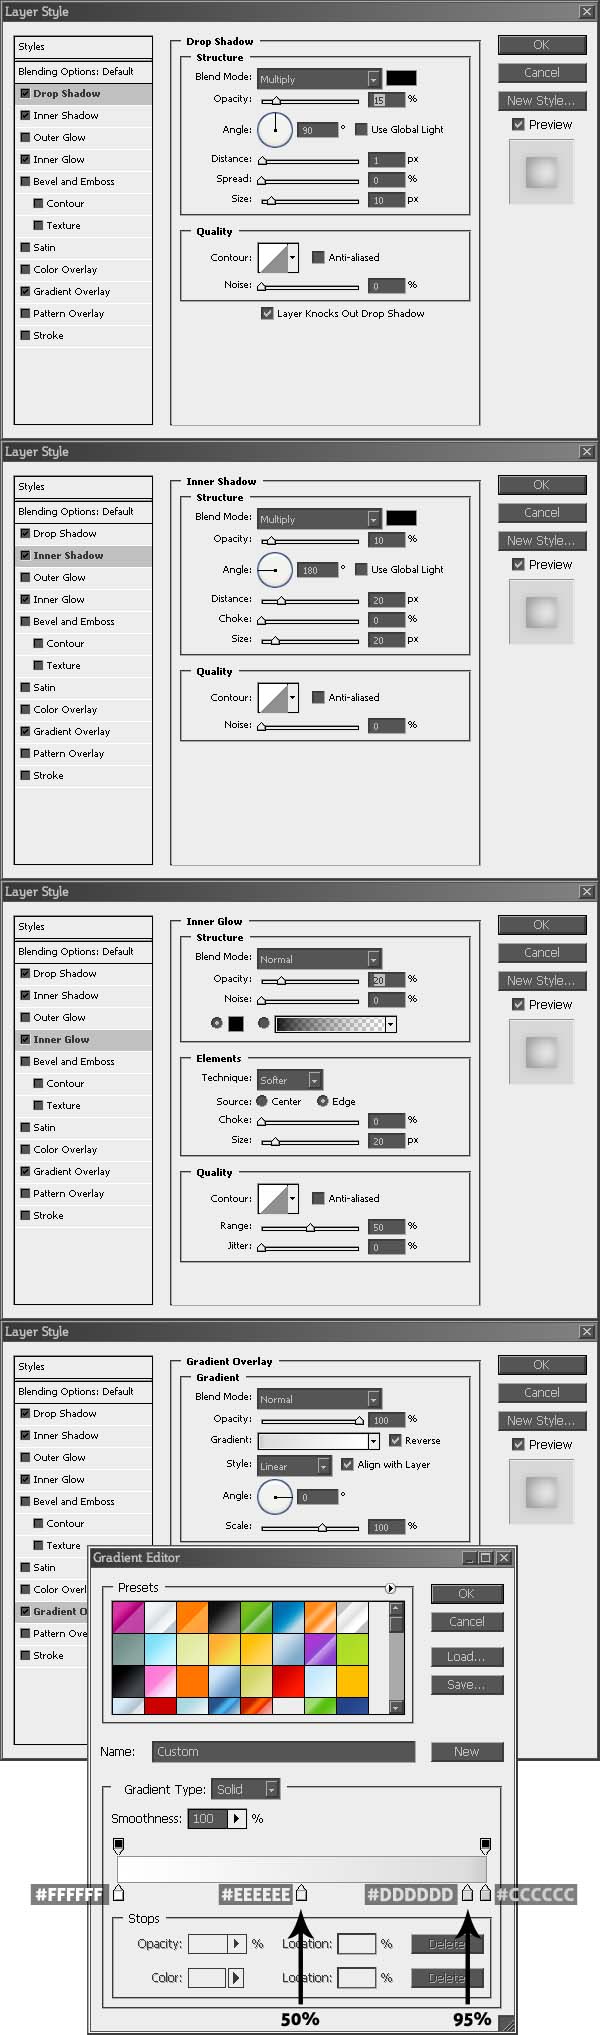
Step 14: More Styling for the Hat
Some major styling is next on the list and you can deactivate the guides (Ctrl + ![]() . Hide the ribbon shape we just created by clicking on the eye-icon at the left of the corresponding layer in the Layers Palette. Right-click on the “Hat Body Bottom” layer and select Blending Options. Keep the Gradient Overlay we already applied, but also add a Drop Shadow, Inner Glow and Stroke with the values shown below.
. Hide the ribbon shape we just created by clicking on the eye-icon at the left of the corresponding layer in the Layers Palette. Right-click on the “Hat Body Bottom” layer and select Blending Options. Keep the Gradient Overlay we already applied, but also add a Drop Shadow, Inner Glow and Stroke with the values shown below.
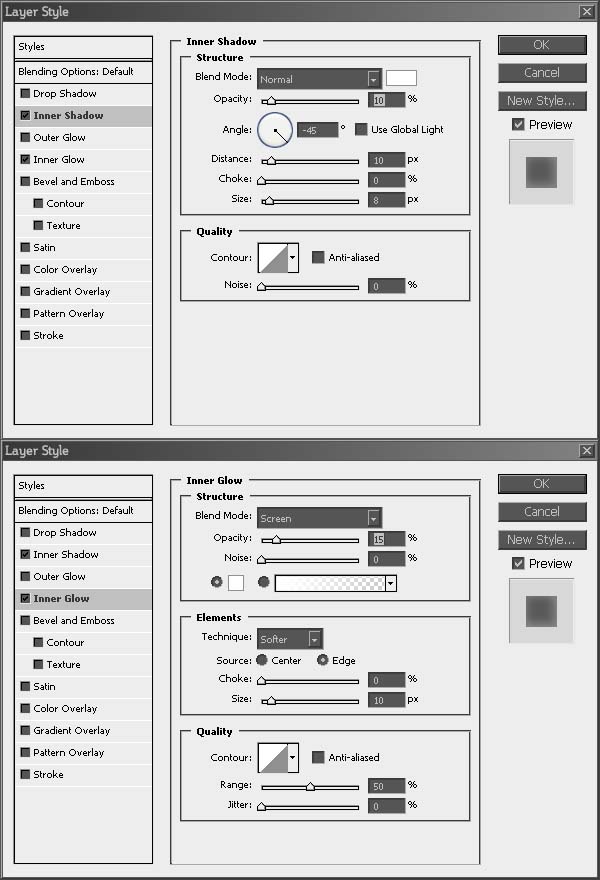
Step 15: Styling the “Hat Top”
Now apply an Inner Shadow and an Inner Glow to the “Hat Top” layer as shown in the image below.
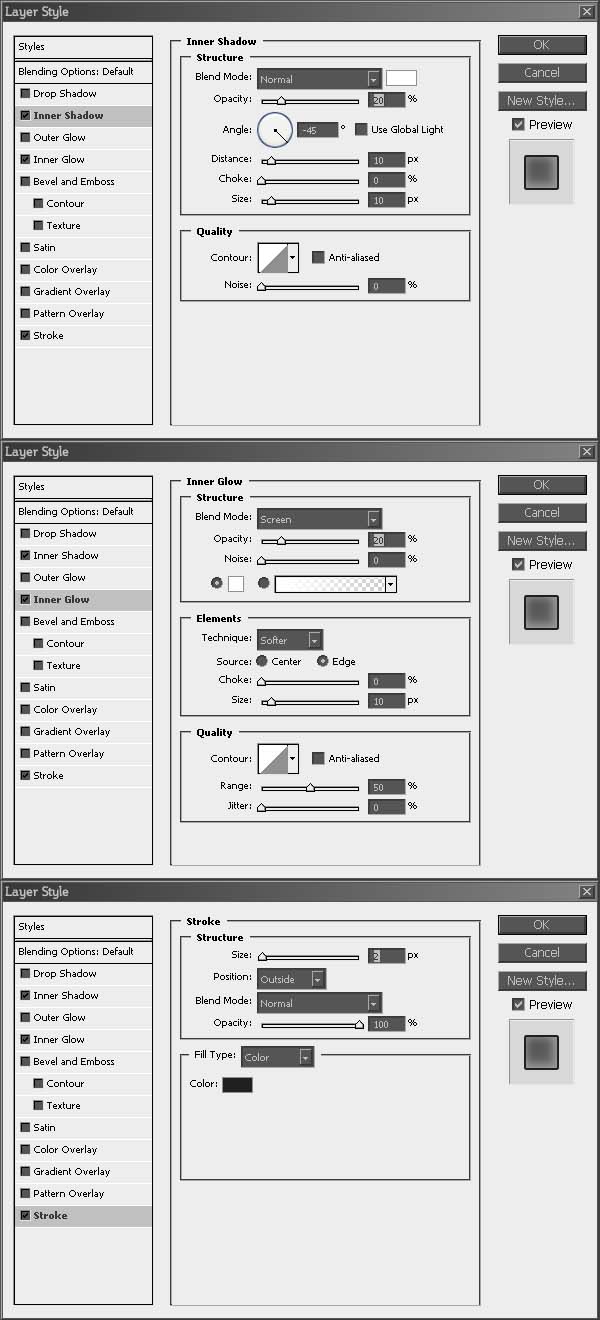
Step 16: Styling the “Hat Bottom”
Then apply an Inner Shadow, Inner Glow and Stroke to the “Hat Bottom” layer. The hat looks already pretty good now, doesn’t it?
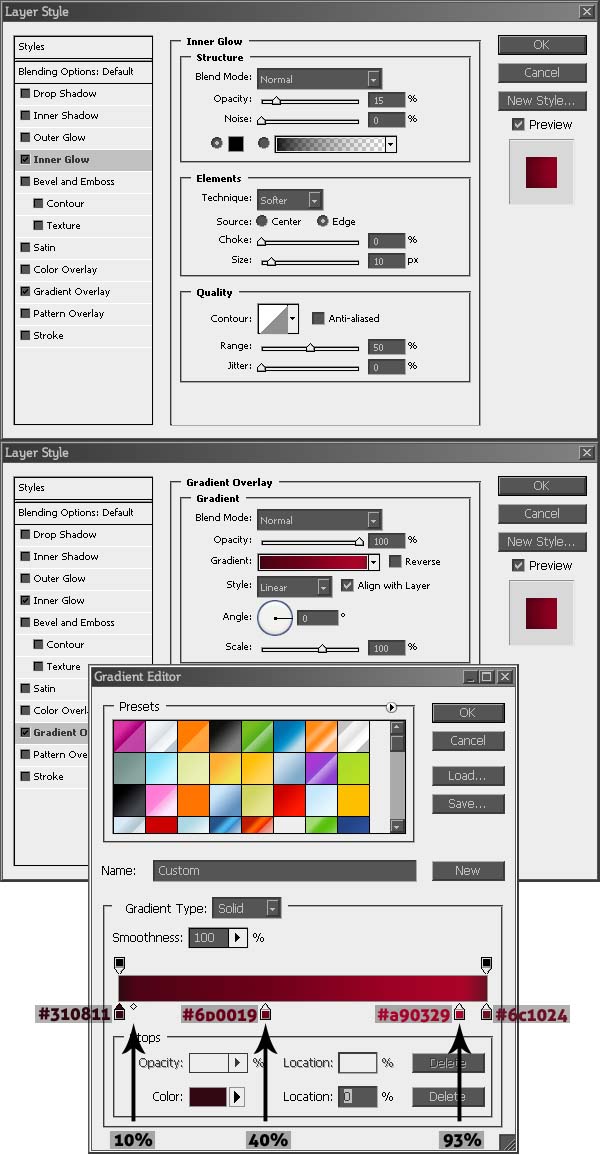
Step 17: Styling the Ribbon
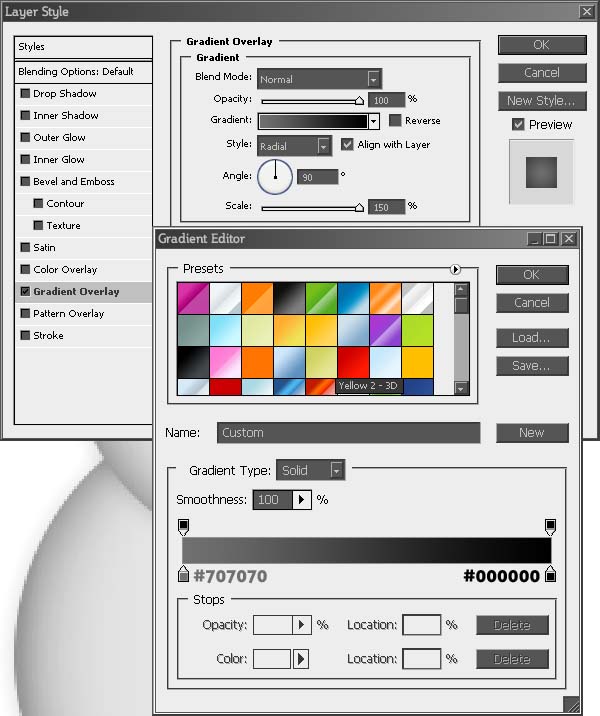
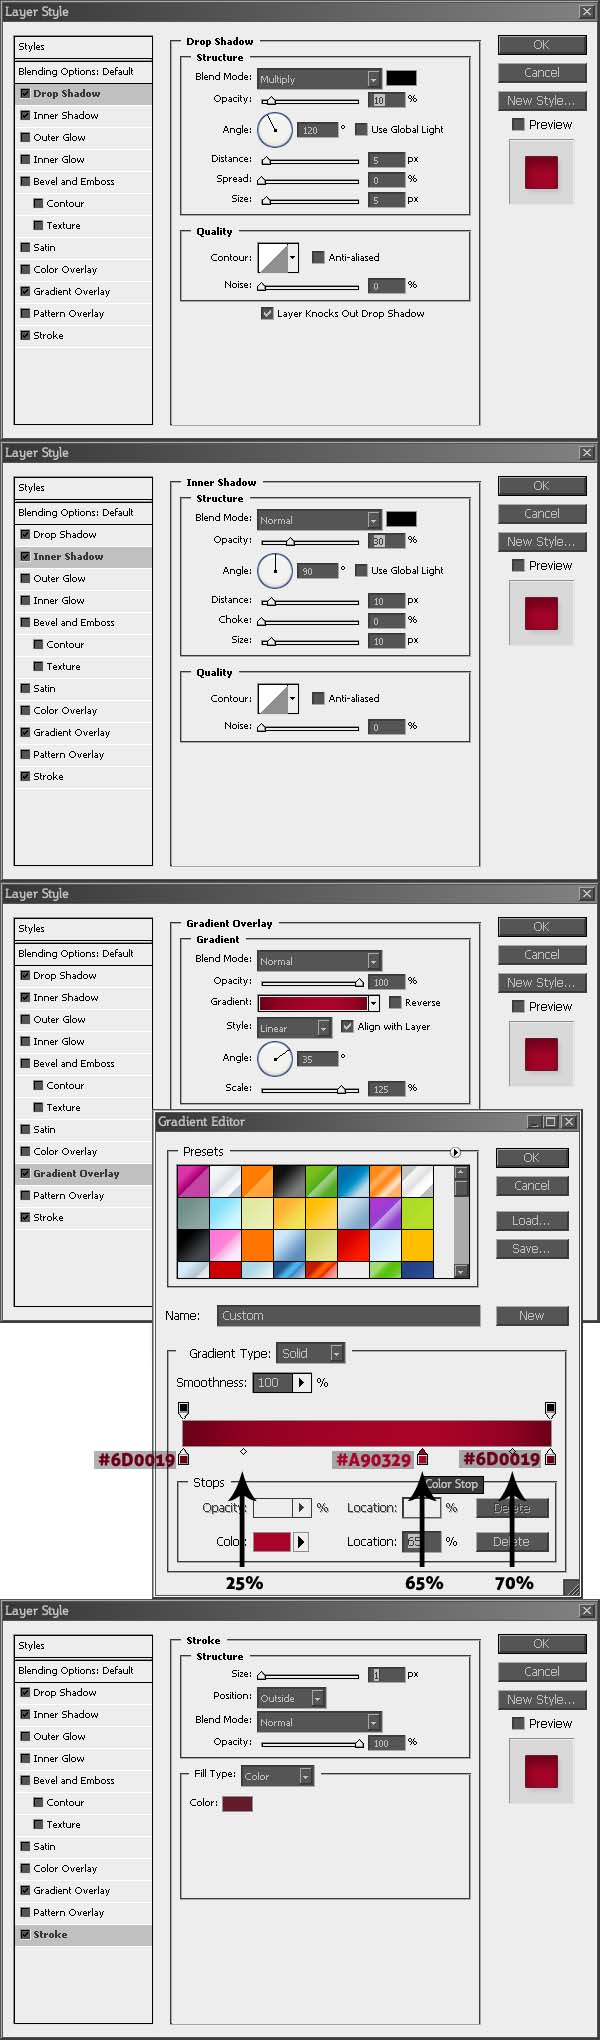
Finally unhide the “Ribbon” shape by clicking where the eye-icon used to be and apply the layer styles as shown below. The Gradient Overlay is a little bit more complicated, but the image shows everything to the last detail.
Step 18: Adding a Shadow to the Hat
We’re almost done with our hat. Create a selection around the “Hat Top” layer by holding Ctrl and clicking on the representative thumbnail next to the layer in the Layers Palette. Create a new layer (Ctrl + Shift + N) and name it “Hat Shadow”. It is important that the layer is placed under the “Hat Top” layer, but over the “Hat Body” layer. Select the Fill Tool (G) and fill the selection with black.
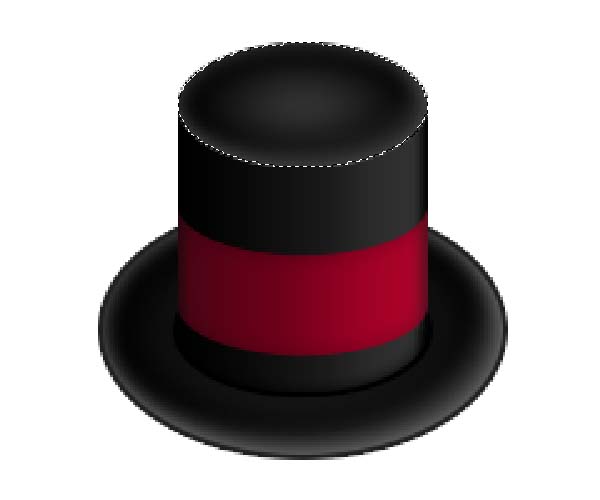
Step 19: Completing the Hat
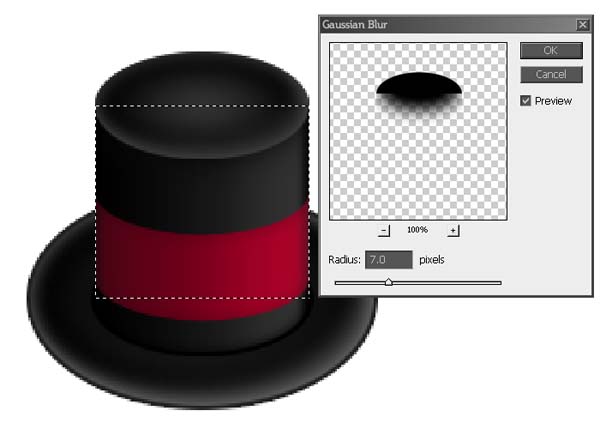
Now create a selection around the “Hat Body” layer by Ctrl-clicking on its layer thumbnail. Go to Filter > Blur > Gaussian Blur and select 7 Pixels as radius. Deselect the selection (Ctrl + D) and move the “Hat Shadow” 2 Pixels down by pressing the Down-key twice. Select every layer besides the background layer and group them together (Ctrl + G). Name the group “Hat”.
Shadows and Glows with Gaussian Blur:
Even though Photoshops Layer Blending Options are an easy way to add shadows or glows to layers of your design they have their limits. With the help of a basic shape and the Gaussian Blur Filter you can create more versatile and individual shadows and glows that can add that last bit of realism to your work.
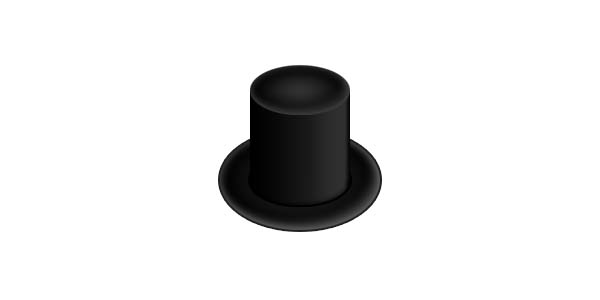
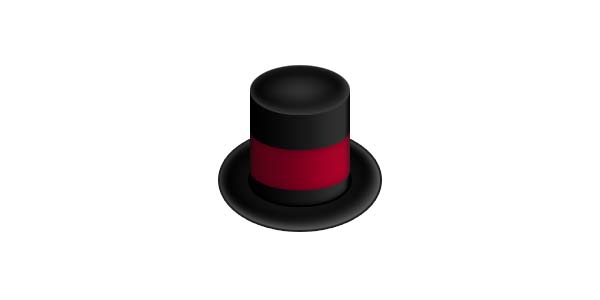
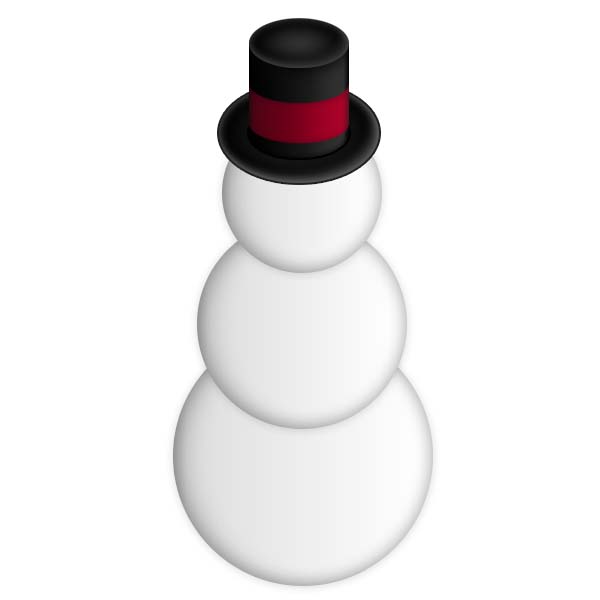
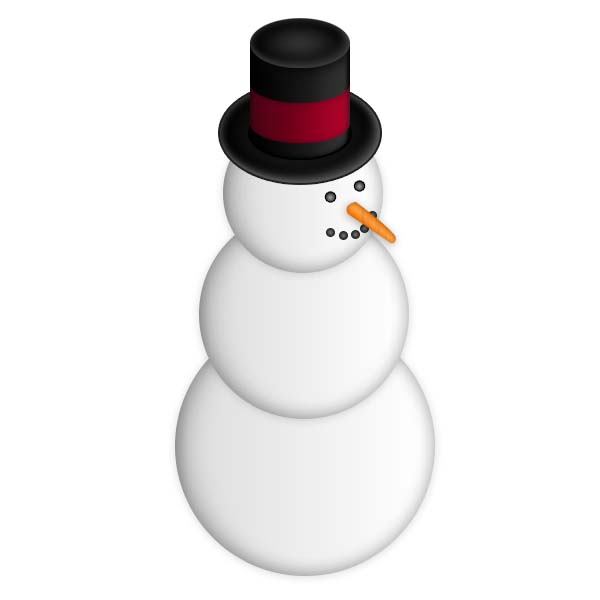
Congratulations, you just created a (finally) beautiful stovepipe hat. A good time to refill your hot chocolate. If you would stop now you would have a great hat icon.
Step 20: Starting with the Snowman
Time to move on to the snowman himself. Select the Ellipse Tool (Shift + U), hold down the Shift-key and create a circle of 160 x 160 px. Center it somewhere below the hat. Name the layer “Head” and apply the Blending Options shown in the following image.
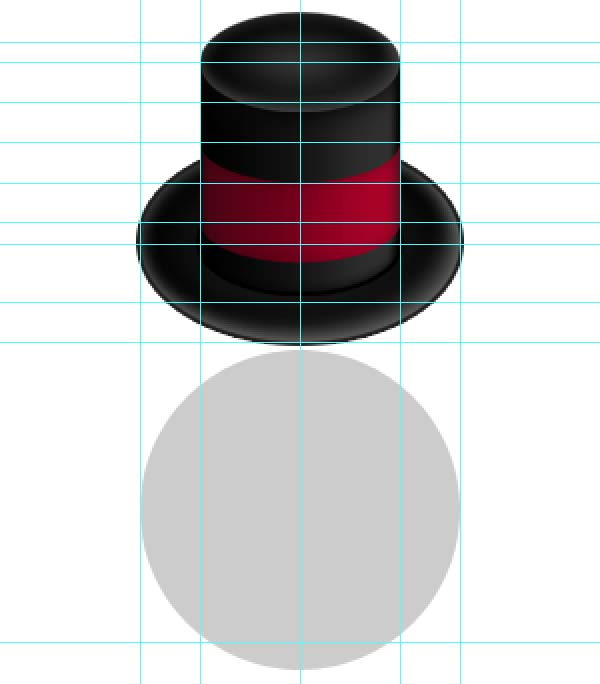
Step 21: Creating the Snowman’s Body
Duplicate the “Head” layer and increase its size by 50px with the help of the Free Transform Tool (Ctrl + T) so that you get a circle with 210 x 210 px (hold down Shift + Alt in order to resize the circle equally on each side). Name this circle “Middle”. Then duplicate the “Middle” circle as well and increase its size once again by 50px, so that you have your biggest circle “Bottom” with 260 x 260 px. Position the three circles appropriately as shown below. Keep in mind that the “Head” layer needs to be the highest in the Layers Palette, followed by the “Middle” layer and finally the “Bottom” circle.
Step 22: Grant the Snowman Eyesight
Let’s give the snowman a face, starting with the eyes. Create a small circle with the Ellipse Tool (Shift + U), name the layer “Eye” and duplicate it. Place them nicely on the snowman’s face. Now apply the following Blending Options to one of the eyes and copy/paste them to the second one.
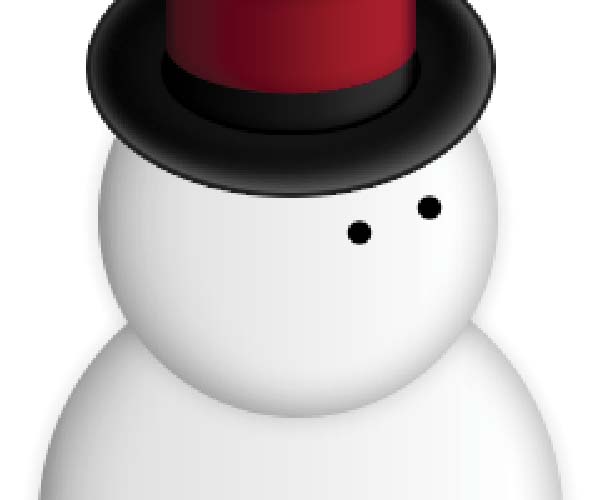

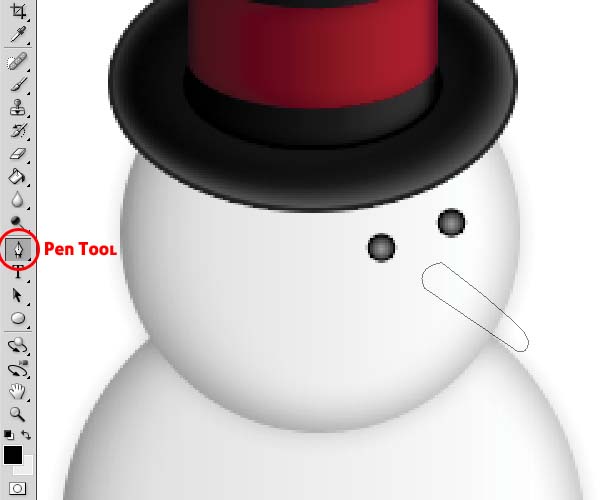
Step 23: Adding the Nose
For the nose we’ll have to create our first own custom shape with the help of the Pen Tool (P). Draw a shape as shown in the image below. Create a new layer and go to the Paths Palette. Right-click on the path you just created and select Fill Path. Once you filled the path you can delete it by hitting the Delete-key.

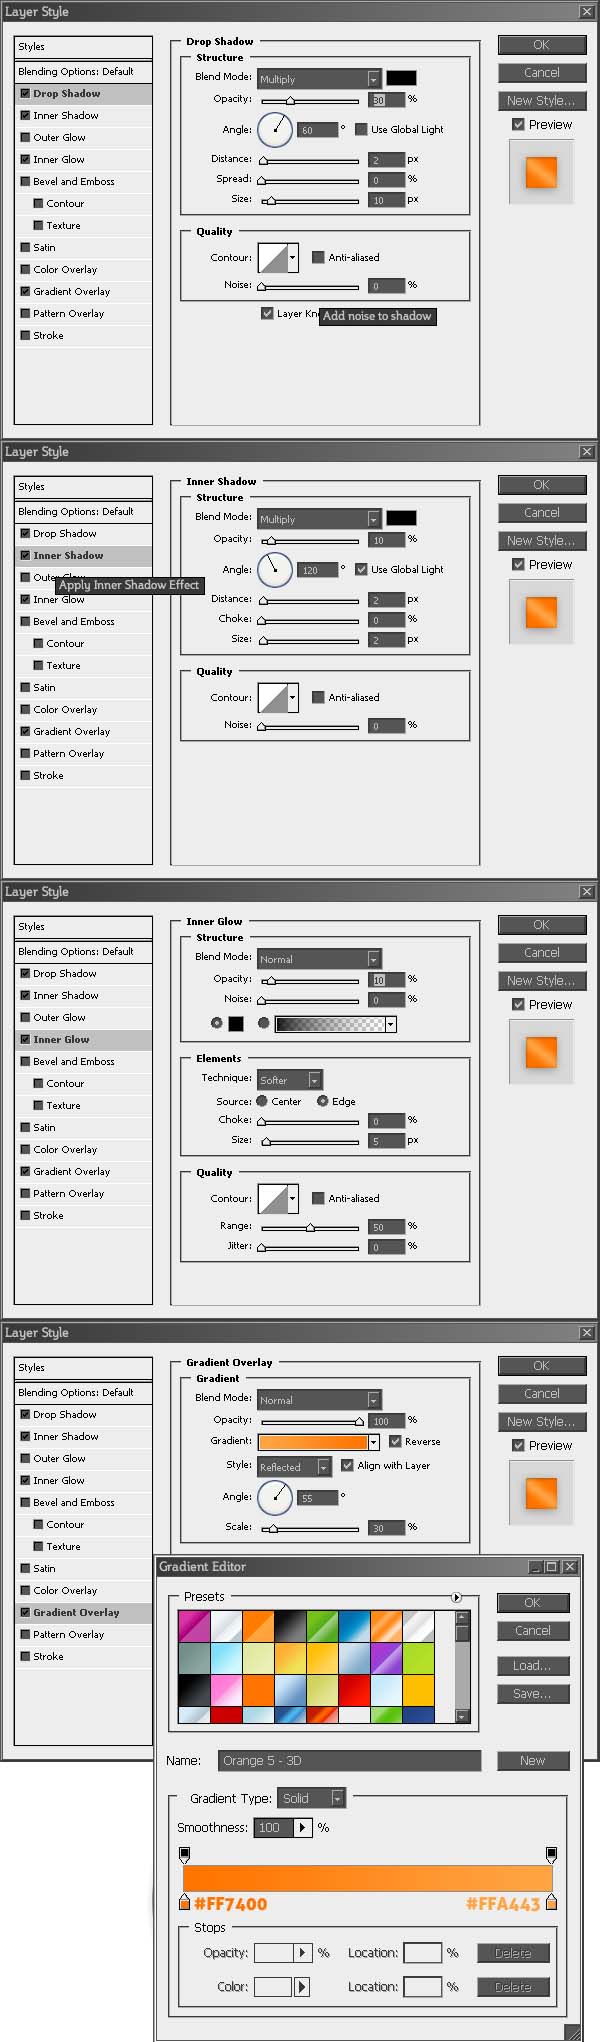
Step 24: Styling the Nose
Select the “Nose” layer (you should also name it like that) and apply the Blending Options shown below. Depending on how you drew your shape you might have to vary the 55°-angle of the Gradient Overlay (make sure that the lightest part of the gradient runs along the middle of the nose).
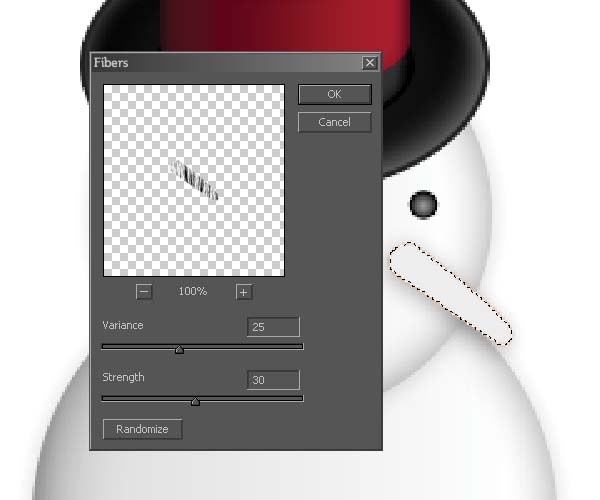
Step 25: Adding Texture to the Nose
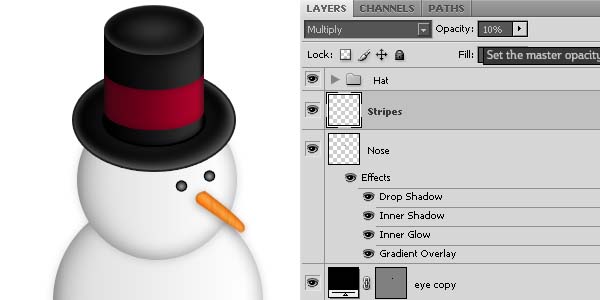
Let’s give the nose some texture. Make a selection around the nose layer by Ctrl-clicking on the “Nose” layer thumbnail, create a new layer and use the Fill Tool (G) to fill it with white. Go to Filter > Render > Fibers and generate a set of fibers as you see fit (you can use the values below as a reference). Set the Blending Mode of the layer to Multiply and its Opacity to 10%.
Step 26: Giving the Snowman a Mouth
We have a nose and eyes, but our snowman is still mute. That’s why we have to create another small circle with the help of the Ellipse Tool. Duplicate the circle 4-5 times and place them in a mouth-like composition (as shown below). Make sure that the circles are placed below the “Nose” layers in the Layers Palette.

Step 27: Styling the Mouth
Now apply the Gradient Overlay shown below to one of the circles and copy/paste the style to each of the circles. The face is complete and you can place all the layers belonging to the face in a “Face” group in the Layers Palette.
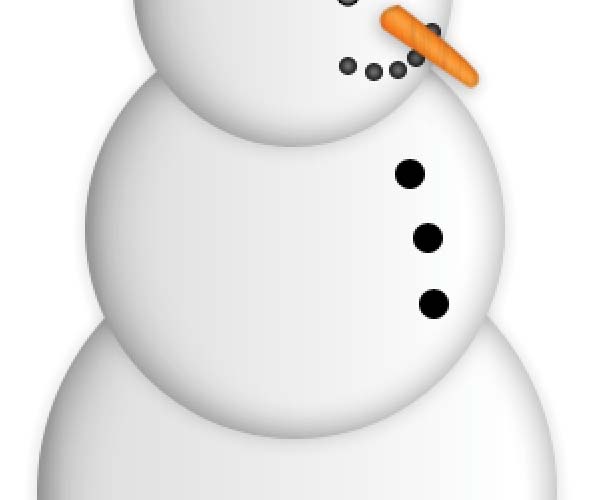
Step 28: Creating Some Buttons
It’s time to give our snowman some buttons for his invisible jacket. Create another circle, this time a little bit bigger than the eye and mouth circles, and duplicate it twice. Place them according to the image below. Copy the Layer Style from one of the “Eye” layers and apply it to all three buttons.
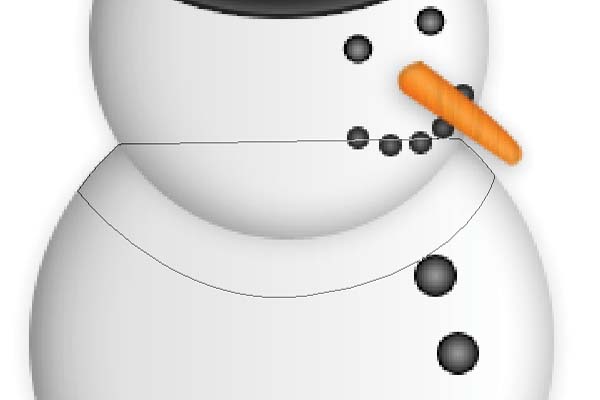
Step 29: Drawing a Scarf
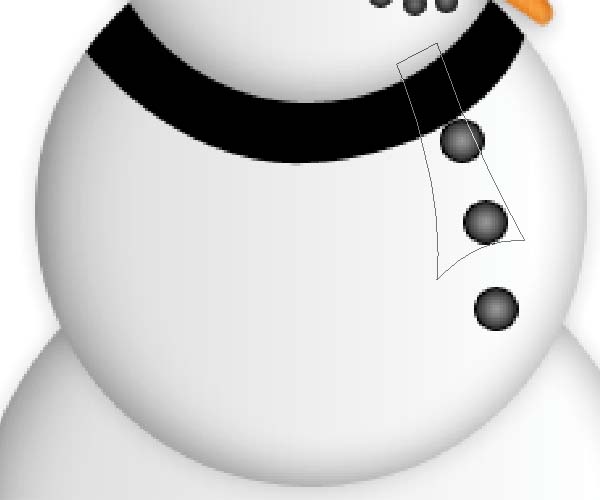
In order for our snowman to stay warm he needs more than just his hat. By creating a shape as shown below with the Pen Tool (P) we make a first step towards a warming scarf. Create a new layer and place it between the “Head” and “Middle” layers of our snowman’s body. Go once again to the Paths Palette and fill the path.
Step 30: Adding the Second Scarf Path
We have to create one more shape with the Pen Tool in order to complete the scarf. Recreate the shape shown below, create a new layer (it needs to be placed above the first “Scarf” layer, but still under the “Head” layer) and fill it as well.
Step 31: Styling the Scarf I
Right-click on the first “Scarf” layer and go to the Blending Options. Apply the styles as shown below, then copy and paste them to the second “Scarf” layer.
Step 32: Styling the Scarf II
We have to make some minor adjustments to the layer styles we just copied to the second “Scarf” layer. You see below what you need to change. The colors and positions of the Gradient Overlay stay exactly the same, only the angle and scale change.

Step 33: Adding the Hands
Our snowman is almost complete. We’ll quickly add a set of hands by duplicating the “Head” layer and scaling it down with the Free Transform Tool. Name this layer “Right Hand” and place it on the body of the snowman. Now you have to duplicate the “Right Hand” layer, name it “Left Hand” and move the layer itself below the “Middle” layer in the Layers Palette. Arrange the “Left Hand” layer so that a part of it looks out from behind the snowman’s body.
Step 34: Creating the Snowman Shadow
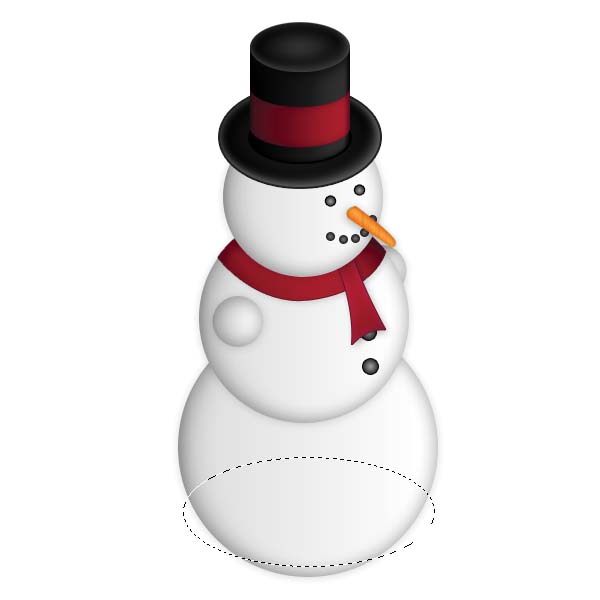
The final steps are here. Create an elliptical selection with the Elliptical Marquee Tool (Shift + M) at the bottom of the “Bottom” layer as you see below. Create a new layer, place it below the “Bottom” layer and fill it with black.
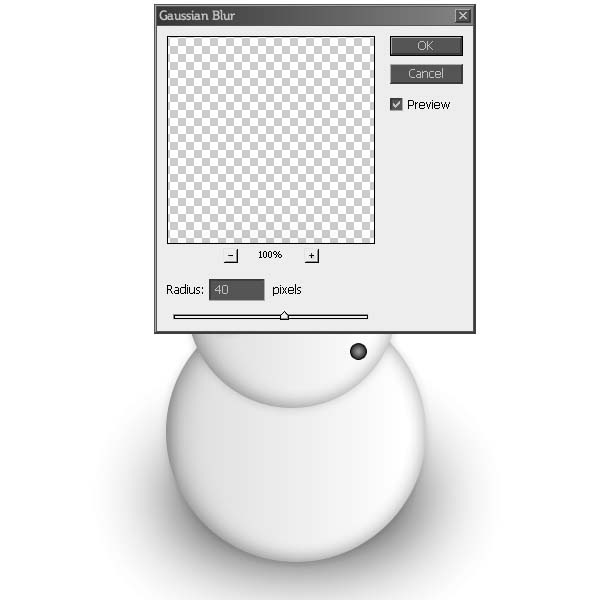
Step 35: Finishing the Shadow with Gaussian Blur
Deselect Everything (Ctrl + D) and go to Filter > Blur > Gaussian Blur. Type 40px as value for the radius and arrange the shadow nicely.
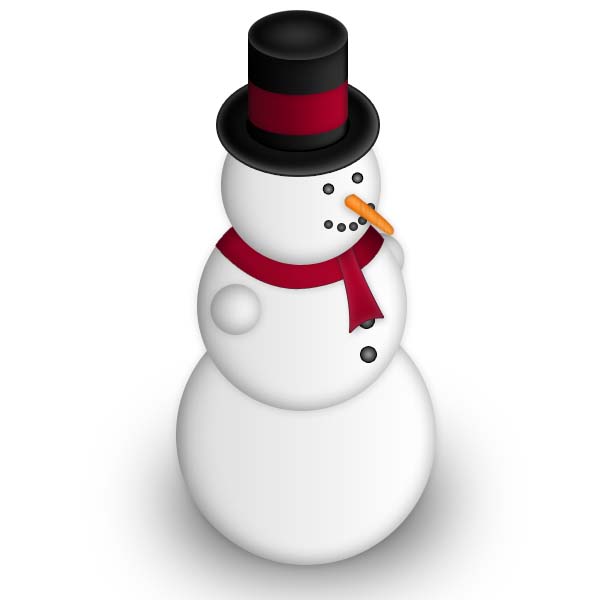
Step 36: Conclusion and Final Image
Congratulations, you completed the snowman and his elegant stovepipe hat. Thereby you didn’t only get to know Photoshop’s flexible Layer Blending Options, but also how to work with paths. If you want you can add an icy ground with a reflection of the snowman to give it the last kick. Be proud of yourself and get yourself your final hot chocolate.
0 comments:
Post a Comment